Author

Mohammad Saram

Browsing

Struggling with your teen’s bedroom mess? Clothes pile up, walls feel dull, and endless arguments erupt over “boring” spaces that feel like a storage box with old fairy lights. It’s agitating when their room screams chaos instead of calm retreat; enraging teenage anger and draining family peace.

How amazing a cozy, chic makeover would look? Searching for the perfect aesthetic and decorative element should be at the top of your list, and we’re here to show you a thoroughly searched list for small teen bedroom ideas that’ll turn that boring and bland space into an enchanting and extravagant dream room.

Pick Your Style, Transform Your Space Without Breaking the Bank

Use these ideas to make your bedroom cozy and stylish enough to offer comfort when you reach home after a tough day.

1. Use LED Lights for A Cute Teen Bedroom

LED lights for a cute teen bedroom

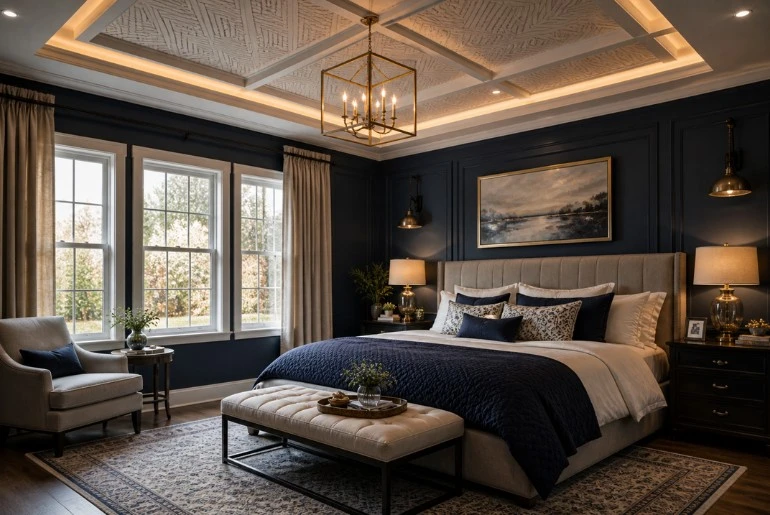
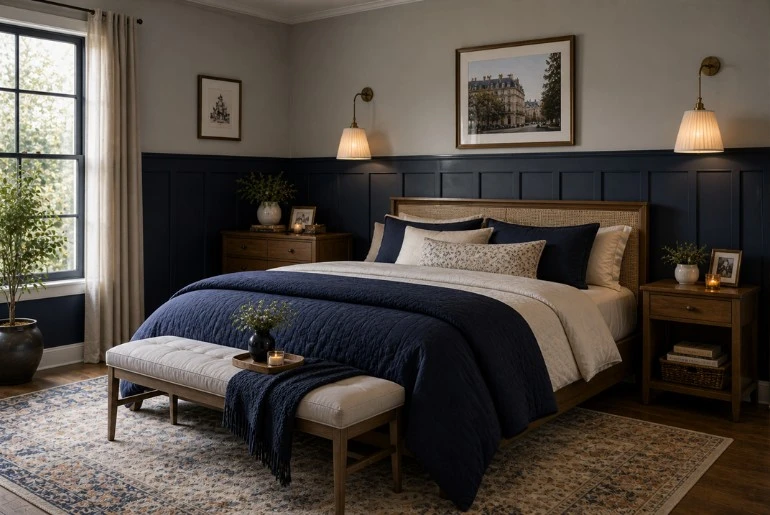
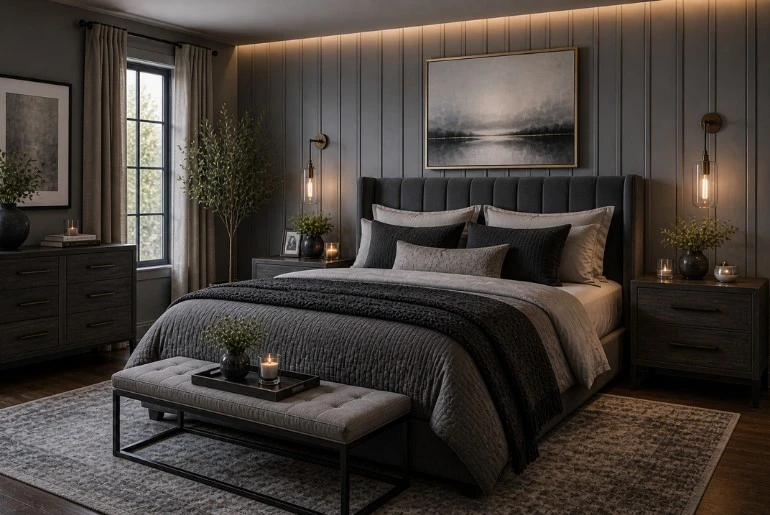
There are tons of design ideas using LED lights. You can place them along the ceiling, walls, or even furniture. For instance, use light strips under the bed, desk, or shelves for a floating effect. Use soft, warm tones or calming colors like blue or purple to create a futuristic yet comfy vibe. If you want to take this aesthetic further, pairing your lighting with moody dark blue bedroom walls can create an even more immersive, ‘main character’ energy that looks incredible on camera.

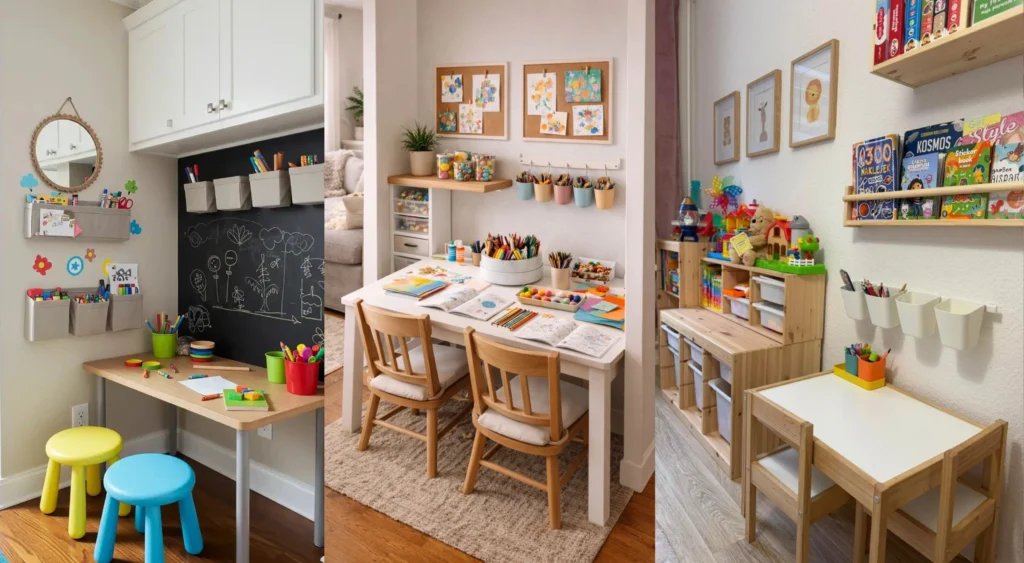
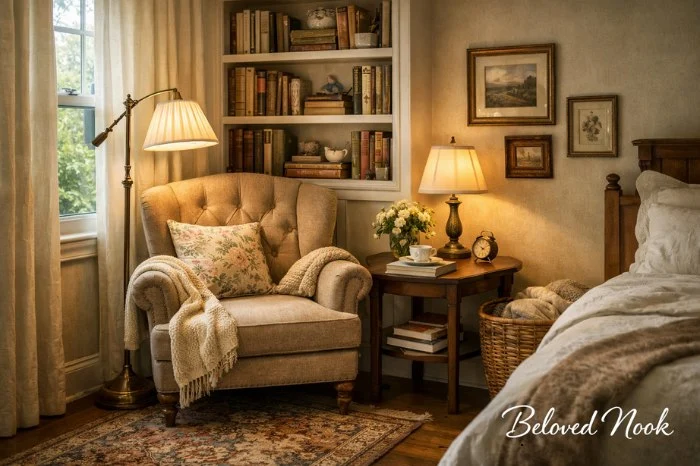
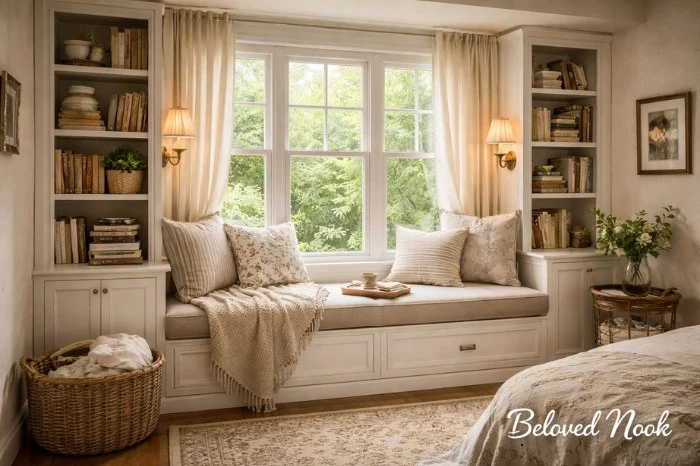
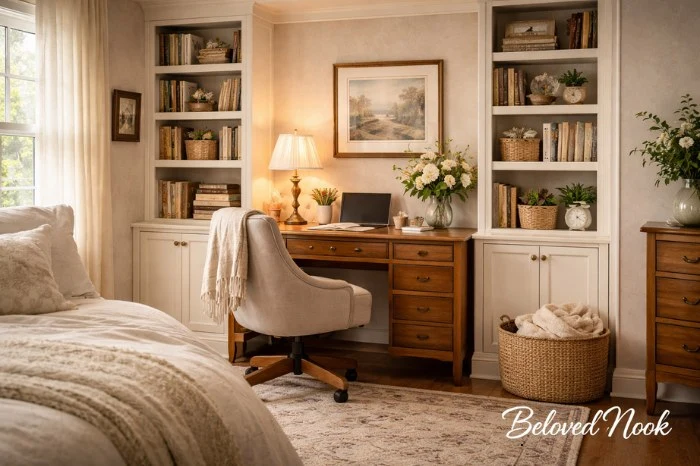
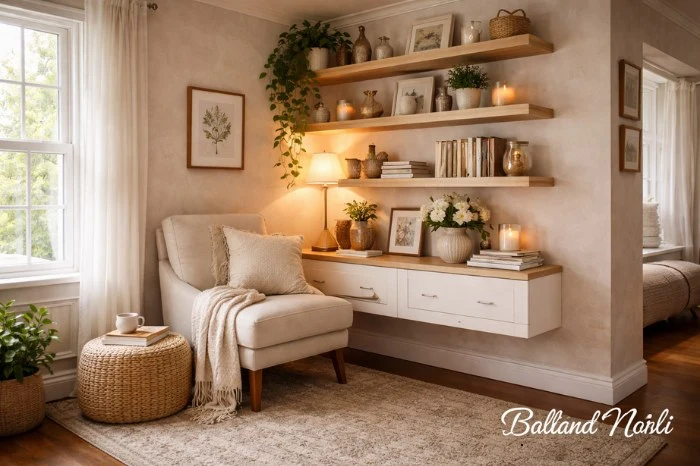
2. Cozy Reading Nook or Desk for Homework

Cozy Reading Nook or Desk for Homework

You can either place a single sofa chair in the corner of your bedroom as a cozy ready nook or make a built-in desk for home office or school work. It is perfect for people who like to rest and study in the same bedroom. If space allows, you can combine a reading nook and homework desk into one area.

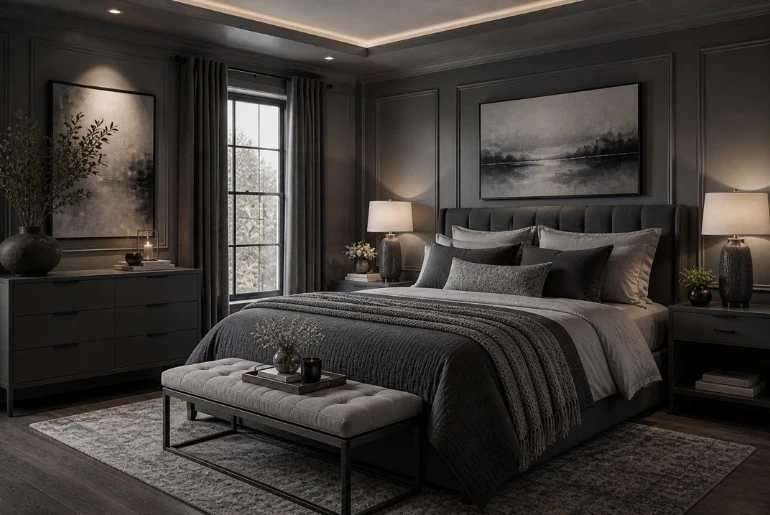
3. Go Bold with Black-and-White Themes

Go Bold with Black-and-White Themes

This one is the most timeless teen bedroom idea for girls and boys if you execute it correctly. Start with the walls. Hang your favorite paintings in black and white colors, or use patterned wallpapers.

Use bedding, textiles, and accessories in the same color shades for a classy monochromatic bedroom decor that feels cohesive and stylish.

For a dark and moody, yet equally sophisticated twist, deep tones like forest green or emerald can also bring a dramatic and cozy feel to the space. These tones offer an elegant alternative to the classic monochrome palette.

4. Functional Bedroom Office Ideas

bedroom office ideas

Choosing the right location for your office desk in the bedroom is the most important factor in keeping it functional. Otherwise, it will just serve aesthetic purposes.

Secondly, choose the color schemes that suit your personality, such as muted light brown accents with cream walls and furniture for a mature and professional vibe.

Keep the cables and wires tidy for a clean look. Add low-maintenance plants like succulents or pathos for a touch of nature. Less stuff means you will require less time to clean the bedroom.

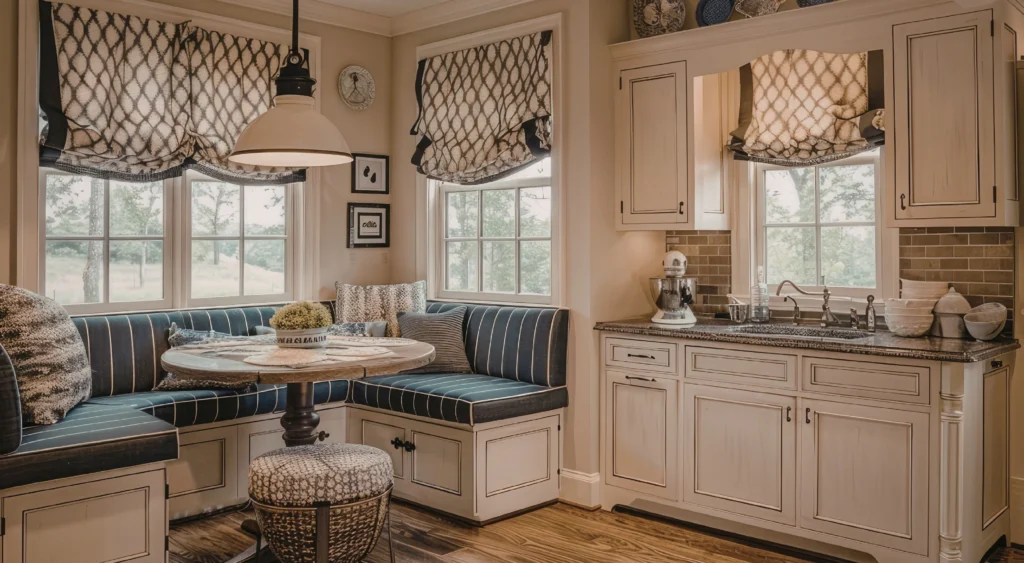
5. Go Retro Chic Bedroom Design

retro chic bedroom design

Short on girl-teen bedroom ideas? Pick vintage elements from 80s and 90s aesthetics in brown, soft pink, mint green, and baby blue hues. Mid-century modern pieces with tapered legs or vintage-inspired designs work well. Florals, lava lamps, vintage posters, and record covers are the soul of this teen bedroom decor theme.

6. Sports or Hobby-Themed Room

Sports or hobby-themed room

Sports theme decor is among the best boy-teen bedroom ideas because almost no boy will dislike them. You can also make it hobby-themed. Add things he likes, for instance, removable decals of sports equipment, team logos, or hobby-related graphics. Plus, you can showcase his achievements on shelves or in a display case.

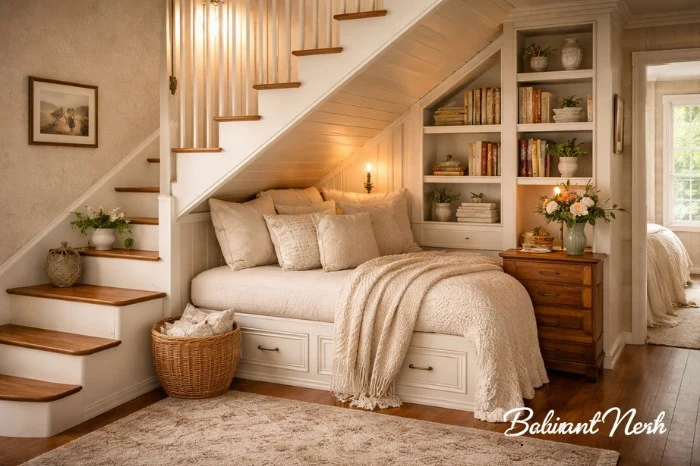
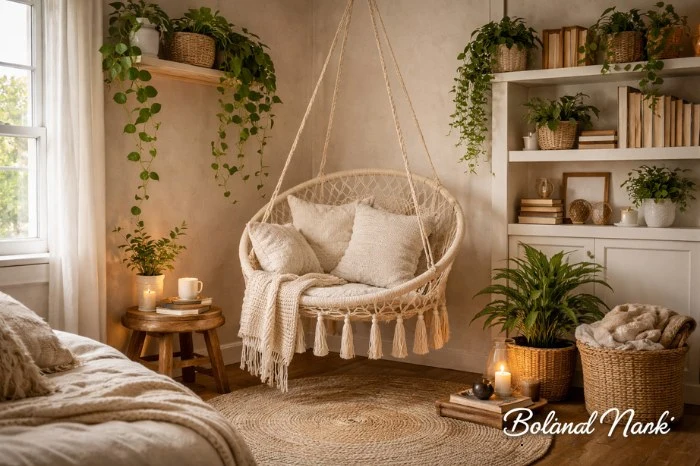
7. Get Creative with Smart Storage for Small Teen Rooms

Smart Storage for Small Teen Rooms

It is the most convenient yet stylish teenage room idea for a girl who has a lot of stuff to store.

Here are some smart space-saving storage solutions:

  • Beds with built-in drawers or under-the-bed storage solutions.
  • Stylish ottoman that doubles as a seat and storage.
  • Floating shelves, hanging organizers, or baskets.
  • Fold-down or wall-mounted desk.

Katie, the home decor and expert interior stylist from Manchester, added more storage to her room by installing sleek drawers and closets in neutral colors.

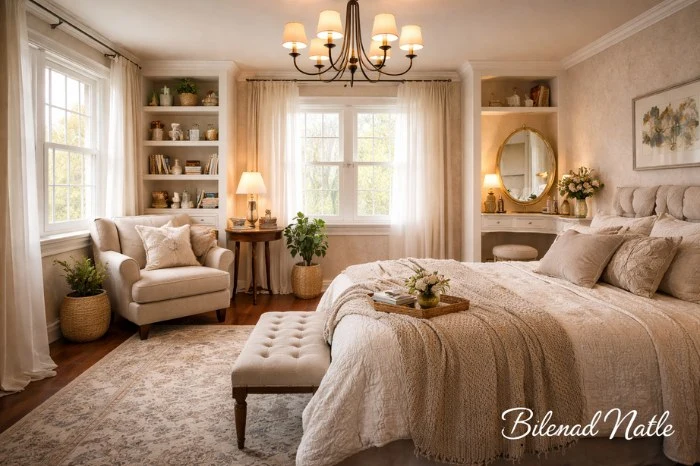
8. Minimalist + Modern Teen Bedroom Ideas

modern teen bedroom ideas

Perfect bedroom wall ideas for pre-teens transitioning into a more mature style. It starts with selecting a neutral color palette with pops of sharp colors as accents.

This could include shades of white, beige, or even various shades of grey for a chic bedroom that offers a serene and sophisticated feel.

Then, choose the low-profile platform bed, pendant light or geometric chandelier, and floor-length curtains to get that classic minimalistic look.

Be aware that the light-colored, textured walls will require frequent cleaning to maintain the modern vibe of your bedroom

9. Tech-Savvy Bedroom for Gamer Boys

Tech-Savvy Bedroom

Start by setting up a powerful gaming PC or a console and place a multi-monitor setup for an immersive experience. It is another evergreen teenage room idea for boys, like a sport-themed room.

Hang neon signs, smart lights, speakers, and shelves. Display collectibles and action figures as decorative. Floor cushions and bean bags are perfect if you invite your friends over for a gaming session.

10. Vintage Teen Room Decor on a Budget

Vintage Teen Room on a Budget

Look for secondhand furniture like wooden desks, dressers, or chairs. Sand and repaint them in pastel or neutral tones. It will be cost-effective and give you the best vintage look.

Buy ornate or antique-style mirrors at thrift stores or flea markets to add more style to your bedroom. Interestingly, this one is a good bedroom idea for couples as well if you hang sheer fabric, vintage-style candle holders, and vintage quilts.

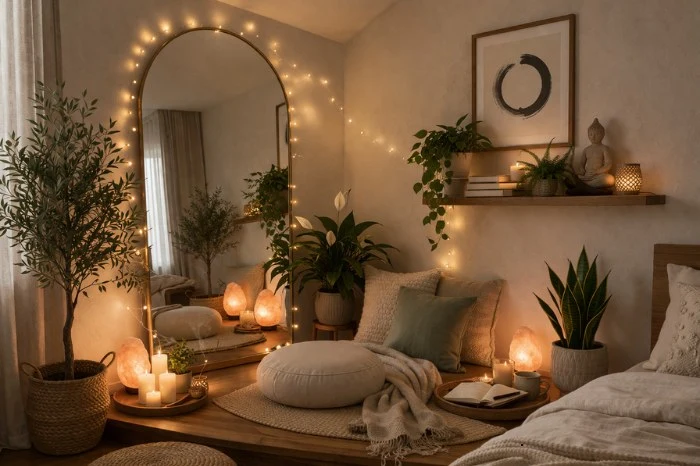
11. Fantasy Design for Your Inner Child

Fantasy Design for Your Inner Child

This is the most whimsical and celestial aesthetic design for a teen bedroom. If your teen is an Enchanted Forest or Alice in Wonderland fan, this idea is perfect for that almost adult age, but still loves fantasy time.

The fantasy decorative ideas are endless. A soft sage-green room with warm fairy lights, where you relax in your little window nook by day, while midnight blue walls with tiny brass accents can mimic a quiet night sky for a peaceful slumber.

If you wish for a budget-friendly version:

  • Use peel-and-stick wallpaper with cloud or forest patterns
  • Add textured throws in velvet or boucle fabric
  • Install warm LED strips behind shelves
  • Add real or fake plants in the room with decorative leaf vines

Martin Brudnizki views the “fantasy theme” not as a frivolous indulgence but as an essential, transportative tool that “lifts an interior” and brings joy and imagination into the home, and that’s exactly what you need.

12. Bring Out Your Artistic Side Design

Nothing says personalized dream room like a mural painted by your own hands. Creative freedom in bedroom makeup doesn’t just establish a living space; it tells a story of its own: splashes of abstract art to represent your thoughts, the starry sky covered in navy blue, a Victorian aesthetic that connects with history, or the 2000s retro murals that remind them of their childhood dreams. Painted walls reflect the artist’s personality, their inner monologue.

The best part, it’s not highly expensive to renovate an artistic room. The most memorable teen bedrooms are rarely the most expensive.

Budget styling can include thrifted frames, handmade ceramics, or painted secondhand desks. If you wish, you can invest in professional track lighting for maximum comfort and gateleg tables for great space optimization.

This living canvas reflects routine, music taste, late-night reading habits, and an evolving identity.

What are Some Pre-Teen Bedroom Ideas?

Every teen should have a personalized bedroom where he or she can relax and work. Depending on the likes and dislikes, you can design them as you want.

Make it themed, contemporary, modern, vintage, or minimalistic. Ensure that the furniture is flexible to match the room decor. Plus, use smart storage solutions and customized artwork for walls.

These cute teen bedroom ideas will help you design your dream space. Try them out, and let us know how you turned your room into a Tiktok-worthy setup.

Gray as a dominant bedroom wall color is a bit controversial because it feels dull, soulless, and sad to many. But the reality is, how you decorate your gray bedroom room makes all the difference.

For instance, in my opinion, one of the best gray bedroom ideas looks like this: Medium-toned linen bedspread + dark charcoal velvet pillows + slightly off-white or very pale flow linen curtains + silver or gold artwork.

At Beloved Nook, we believe your bedroom should feel like your most cherished corner, and gray is the perfect canvas for that.

10 Modern yet Simple Gray Wall Color Ideas for bedroom

Look at these luxury gray bedroom ideas to make your living space inspiring and cozy. While gray is a versatile neutral, the editors at Beloved Nook often suggest that those seeking a deeper, more dramatic flair should also consider modern navy and dark blue room concepts to create a truly high-end sanctuary.

1. Natural Accents to Elevate Your Cozy Grey Bedroom Decor

Natural Accents to Elevate Your Cozy Grey Bedroom Decor

Natural textures effortlessly blend with dark gray bedroom color and add more depth. You can get a wood bed frame, nightstands, or a dresser in light oak, walnut, or weathered finishes. Install floating wooden shelves to display plants, books, or rattan baskets.

Another similar idea is installing full or half grey colored wood paneling in your bedroom for a refined yet natural look as wellas to keep the walls spotless, and long lasting .

2. Incorporate Warm Tones With Grays

cozy grey bedroom decor

Many people consider gray to be the best neutral color as it pairs with most colors perfectly.

Try these trendy ideas to add color to your teen’s bedroom.

  • Terracotta, mustard yellow, or sage green bedding.
  • Incorporate hints of emerald green to give it a cool, modern edge.
  • Throw some burnt orange cushions. And swap in some blush pink when spring hits.

See this bedroom design tip in action:
Jordan Miller, a DIY and design influencer, shared how she remodeled her gray guest bedroom with colorful pillows and pink pinch-pleated drapes.

3. Make Natural Light the Focal Point

light grey bedroom ideas

Making the natural light source the focal point of your grey room is another clever way to balance the tones with warmth and depth. You can install large mirrors, choose low beds to avoid blocking light paths, or get a crystal decor (glass vases and Lucite trays) to add shimmer effortlessly.

However, make sure that your bedroom remains clean all the time for a sophisticated vibe.

4. Starry Night Sky Ceiling Design

modern cozy grey bedroom decor

If you love a dramatic theme in your couple’s bedroom, getting a starry night glow on the ceiling is the best option. It looks incredibly stunning with an expensive vibe and works beautifully in a white and gray bedroom for a modern, elegant feel.

There are tons of ways you can get this design:

  • Use a fiber optic star ceiling kit.
  • Install fairy lights in a random pattern on your ceiling.
  • Add some metallic vinyl decals or hand-paint stars with metallic acrylics for a cool touch.

To make it more cohesive, use silver, white, and icy blue colors in decor. Pick duvet covers or shams with metallic color threads for a hint of shimmer.

5. Use Blush Pink for a Cozy Gray Bedroom Decor

Use Blush Pink for a Cozy Gray Bedroom Decor

Strategically using blush pink or any other pastel shade can really make your room look different. Hang abstract art blending both colors, or frame botanical prints. Try a gray dresser with blush drawer fronts or add white accents (sheer curtains, white pottery) and greenery for freshness.

This idea is perfect for home office decor, as you get a comfortable, relaxing vibe for work.

6. Deep Teal Walls With Gray Bedding

Deep Teal Walls With Gray Bedding

Ever thought a dark green and gray bedroom would look this lively? That’s the magic of pairing colors smartly with gray. According to the London Image Institute, teal actually makes the mood pleasant and relaxed. And when combined with grad , it looks exquisite as well.

To balance this dark shade, you can choose the light flooring. Ivory lamps, cozy rugs, and simple art pieces help set the vibe just right. Make sure you clean and maintain the gray walls properly so they don’t lose their charm or start looking dull over time.

7. Patterned Ceiling That Complements The Walls

Patterned Ceiling That Complements The Walls

A plain grey wall may feel good, but could definitely use more pizazz. Your bedroom’s fifth wall, the ceiling, is really where you want to focus your efforts in creating excitement and variety for your bedroom decor.

For instance, using geometric stencils or softly striped patterns on your light-grey walls will create an elevation shift in your room through the ceiling.

  • Coffered Ceilings: Provides a classic yet luxurious approach. It consists of a grid of recessed panels, which are made from either wood, creating a traditional look, or are blended with modern lighting as a way to create a contemporary ceiling.
  • Herringbone Wood: A unique texture to your living spaces, while still allowing light fixtures to grab attention.
  • Modern Geometric Tracery: Open tracery patterns or diagonally layered geometric shapes will create amazing visual depth when they are combined with LED strip lighting.

Expert colorists note that patterns above eye level can increase perceived room height by nearly 15%. Moreover, they also advise on the use of a matte finish to diffuse light softly.

8. Two-Tone With Lower Wood Panels

Two-Tone With Lower Wood Panels

When efficiency meets Parisian elegance. The two-tone wall, bisected by a functional lower wood panel, is the secret to “organized soulfulness.” Get ready to set your split at exactly 38 inches to mimic the classical golden ratios.

The most popular style of two-tone wall is with a darker lower wall and a lighter top, such as a light gray plain top with a navy blue board and batten design bottom that elevates a novice vibe to the bedroom and creates an understandable visual structure without chaos.

Interior stylists love to play with this type of wall design, peg rails, and beadboard with a stylish border that separates the double-colored wall. This half-wood wall panel creates the luxury, elegance, and grace you might be searching for in your room.

9. Monochromic Decor With Gray

Monochromic Decor With Gray

Going all gray sounds risky and boring to some, but you need to be creative with this. The best way to make this theme work is through variation.

Work with all types of gray: warm grays, cool grays, textured gray. Use the whole gray scale out there. Monochromatic gray is a masterclass in texture over tint.

Use light mist grays for a dreamy dawn feel, or deeper charcoals for a dark and moody drama type bedroom, as experts like Color Consultant Justyna Korczynska from Crown recommend, noting how “darker tones add drama anywhere; creating a strong, atmospheric look.”

In addition, A monochromatic palette is scientifically proven to improve sleep hygiene. Its color blend is so on point that even a small room feels wider. This isn’t just a color choice; it’s a commitment to calm.

10. A Painted Wood Panel Design

A Painted Wood Panel Design

Painted wood panels in gray instantly add architectural interest without renovation-level cost. Vertical lines draw the eye upward, while the shadows between slats create a natural gradient that paint alone cannot mimic, projecting the walls to look custom-built. Industry insiders call this Tactile Modernism.

Whether it’s board-and-batten or skinny slats, the shadow-play provides a 3D experience. Experts often recommend this for adding “perceived value” to a room.

It’s rugged, yet refined, the ultimate backdrop for a velvet headboard. So, it’s elevate your status from homeowner to curator with one weekend project for a timeless resale boost and an eternal cozy vibe.

Why Is A Gray Palette Good For Your Bedroom?

Gray walls create an environment of relaxation for your modern bedroom getaway by combining contemporary with a sense of tranquility.

The gray color scheme is like crawling into bed at night, covered in neutral luxury, so that you can go to sleep with less chaos and have more peace, like an hour after an active day.

Gray is not just a color; it can be your gift from God in creating a modern bedroom design that is as contemporary as it is personal.

The grey color scheme is also beneficial for your brain (psychologically), as Rachel Goldman explains about how the monochromatic grey color tones ground overstimulated brains to bring the same peace you would have felt from a big fuzzy blanket hug after managing 100 miles of to-do lists. You won’t have visual noise or mental clutter.

The first thing you will see or feel when waking up will be a light, airy, calm, and relaxed interior decorated with a lot of natural light.

You do not need bold, dramatic colors to make an amazing statement in your new bedroom. Just keep it simple and clean so that your refined lifestyle speaks for itself.

Next Step: How to Make a Gray Bedroom Feel Warm?

To make your gray bedroom warm, use soft, ambient lighting, layer textures (faux fur throws, chunky knits, woven rugs), and add warm accents. Balance cool gray tones with earthy materials like wood or rattan for cozy contrast.

Do you struggle with your space? Do you wish to convert your kitchen into a warm, functional and inviting place, all at the same time? You’re certainly not alone. Many homeowners invest in layouts but still miss that cozy, usable corner that makes daily living easier. The truth is, without thoughtful planning, your kitchen has a wasted space staring at you in guilt.

You know what can turn that frown upside down? A kitchen nook! Yes, kitchen nooks are about to solve world hunger, and I mean the hunger for those intimate, efficient zones that boost your home’s flow and value. This article shows you some beautiful but practical ideas to create a kitchen nook in your house with little to no effort, and with your decisions.

1. Window Nook

Window Nook

A window-side dining nook is one of the most desired kitchen nook layouts, and for very obvious reasons. Think about all that natural lighting instantly kissing your face as you sip on your morning coffee.

Your ambiance is enhanced, your space feels larger and more inviting for weekly brunches. All you need are some linen curtains, cushioned upholstery, and some wooden tabletops to create that soft, warm glow that will bring you a perfect scene for your everyday meals.

2. Corner Nook

Corner Nook

Now this is an overused idea, but how can we leave out the ideal breakfast nook in the kitchen (corner breakfast nook ideas)? Corner nooks rank high for their no-fuss efficiency in busy homes. Small or large?

Doesn’t matter. Corner nooks still look so classy and modern; it’s like optimizing every nook and cranny of your house to achieve that Pinterest aesthetic.

These corner breakfast nook ideas are so famous because they create a defined zone without adding restrictive walls, allowing you to integrate functional spaces, blending breakfast areas into a broader room beautifully.

3. Attached Island Nook 

Attached Island Nook 

This might seem like a questionable eating nook design idea, but give it a chance. A nook attached to your island. They might seem like an odd choice, but it is said to foster family chats and deepen blood and water connections without dominating the room. You’re sitting there, chatting with whoever is cooking and witnessing the cooking process with your very eyes.

In addition, you can easily angle an L-shaped booth against the island’s rear face to save square footage. This setup acts as an extended coffee nook in kitchen centers, making these kitchen nooks highly practical for quick meals.

4. Low Drawers As Seats

Low Drawers As Seats

Who doesn’t love extra space for their extra items? Modern little kitchen nook concepts are going toward low drawers rather than conventional benches. Using under-seat cabinets to remove clutter, these space-saving wedges integrate seating with storage.

Moreover, it keeps a specific degree of cleanliness; thus, because these secret chambers keep your stored goods accessible and dust-free, deep cleaning your home feels like a breeze. Do you wish for additional nook storage?

5. Tightly Packed Nook

Tightly Packed Nook

You live in a tiny house with not much space to spare, yet you yearn for those aesthetically pleasing nooks in your kitchen. Maybe a kitchen nook idea without a table approach works for you. In tight spaces, vertical design matters. Use rattan chairs or narrow window seats paired with foldable surfaces.

Incorporating versatile gateleg table designs is an excellent way to provide a full dining surface when needed, while tucking away neatly to keep the floor clear.

This keeps the area flexible while maintaining usability. Add light fixtures, herb planters, and chalkboard menus to create that dream nook without having a stuffy, non-functional kitchen.

6. Child-Friendly Nook

Child-Friendly Nook

Can’t forget the children, the sparkle of every parent’s eyes. This coffee nook in the kitchen can also be a juice box nook for your children. Add playful features such as chalkboard walls or recipe flip boards. These transform the nook into an educational hub where kids can draw or learn basic cooking concepts.

Including bright colors, floral cushions, and fun placemats creates an engaging atmosphere while maintaining functionality. Furthermore, a child’s safety must also be a priority, so try to use rounded edges, cushioned upholstery, and durable fabrics like checkered materials for safety.

7. 80s Aesthetic Nooks

80s Aesthetic Nooks 

In the world of  Pinterest, modern kitchen nook ideas, you are an 80s style vintage inspired breakbook nook person, aren’t you? Let’s design your nook: bold patterns, checkered fabrics, vintage seatings. Get accessories like candle holders, ceramic pitchers, and fruit bowls as the cherry on top.

That nostalgic vibe is finally kicking in, and those teal colored splashbacks are blinding but perfect. If you want to lean more towards this aesthetic, you need to purchase retro appliances or decorative teacups to add that unique personality. You need to sell that style, so go all out with your cool grandmother’s furniture.

8. Minimalistic Nook

Minimalistic Nook

I’d call this a “safe choice” personally, but everyone has a preference. On the plus side, deep cleaning your kitchen would be a 5-minute task with that minimalist aesthetic. Designed with simplicity, a kitchen corner highlights plain lines and neutral color schemes.

Soft greys, whites, and beiges provide a tranquil, spotless setting. Floating shelves can be added to give it a sharp appearance and spice it up. Minimalism had the highest practicality rate as it blends into any kitchen, proving that less truly is more when designed with precision.

Conclusion

Well-planned kitchen nooks may turn even the tiniest kitchen into a very useful and welcoming area. Each concept has a specific function, from small drawer-based systems to window seating soaked with natural light.

These ideas guarantee every square foot is properly used, whether you are dealing with a cramped layout or designing a new construction. The secret is to strike a balance between comfort, storage, and flair without overly complicating the design.

Have you ever been awestruck by a mere glimpse of someone’s home at the exact moment you entered it? When I first looked at the board and batten wall at my friend’s home, I was fascinated to see how it had added elegance, charm and delicacy into her space. After that experience, I was motivated to reflect upon DIY Board and Batten Walls Ideas and style my home using them.

Understanding Board and Batten Walls

Board is a term that refers to wide wooden panels while batten means narrow timber strips. Board and Batten walls are those ornamental and decorative patterns created on walls that add grace and artistry which is attained by incorporating broad and thin pieces of wood.

In ancient times, barren and boards were used in the exterior part of the home. Board and batten in the exterior of the home gave definition to the structure of the house, increased its worth and gave the residents feeling of contentment. Now it is used as a home decor and to store accessories.

These were considered to be outdated for the time being but now people have begun to realize the value of walls adorned by this technique.

Top 5 Ideas to Create DIY Board and Batten Walls Like A Pro

Here are 5 ideas and a step-by-step guide to join the bandwagon. Happy reading and learning!

1. Living Room Board and Batten Wall Decoration

Living Room Board and Batten Wall Decoration

You can adorn the living room by using timber in horizontal as well as vertical order. By using multiple strips of timber in a contrasting scheme of colors, you can create your own board and batten wall in the living room.

It is a great idea to upgrade your living room. You can also place paintings, and rugs that compliment the furniture and paint of your living room. In case you are a Phytophile (Plant Lover), you can place plants near to the wall. Rustic board and batten interior walls are also an expression of elegance and have a classic taste!

2. Bedroom Board and Batten Wall Decor Ideas

Create DIY Board and Batten Walls

You can use the same maneuver to embellish the bedroom as well. Add some modern art to the clean white walls and create a more inviting and personalized space. Don’t forget to incorporate soft lighting and soothing colors if it is a teen bedroom design. For a sophisticated touch, consider pairing the board and batten walls with a classy black and white bedroom decor, which complements the timeless elegance of the wood patterns and creates a striking, modern contrast.

3. Restroom And Water Closet Renovation Ideas

Restroom And Water Closet Renovation Ideas

For the sake of elevation of the restroom or water closet, using timber to create a board and batten wall is great.

4. Dining Room Design Inspirations

Dining Room Design Inspirations

To enhance the dining room, using timber panels is a good choice. Darker tones or rich colors on the walls can bring depth and warmth to the space, similar to how deeper shades, like forest or mossy greens in bedroom spaces, can make a room feel grounded and intimate.

Bonus Tip: You can also get many Board and batten hallway ideas Moreover, you can also renovate your hallways by the use of wood panels and strips to make them aesthetic. Just ensure that you keep walls clean, as it can be tough for buddy people to keep sweeping walls every other day.

5. Entryway Wall ideas

A board and batten installation instantly elevates a foyer, providing the structural interest and “architectural soul” often missing in modern builds. For a sophisticated first impression, try a floor-to-ceiling grid to add height, or opt for a classic three-quarter height topped with a functional picture ledge. Integrating small entryway organization ideas into your woodwork ensures the space remains as practical as it is beautiful. To complete the transformation, choose the perfect white paint to make the shadows and clean lines of the molding truly pop against your decor.

Wainscoting Vs Board and Batten Walls

FeatureWainscotingBoard and Batten
Primary StyleElegant, formal, and traditional.Rustic, farmhouse, or modern-industrial.
ConstructionTraditionally uses raised or recessed panels with decorative molding.Vertical “battens” (strips) placed over wider boards or flat drywall.
Typical HeightOften covers the lower 1/3 of the wall (approx. 32-36 inches).Flexible; ranges from chair-rail height to floor-to-ceiling.
MaterialOften high-grade wood, MDF, or PVC for bathroom moisture.Usually simple wood planks or MDF strips for a cleaner look.
Visual TextureIntricate, layered, and ornate.Geometric, clean-lined, and architectural.

Wainscoting usually occupies a wall’s lower third while Board and Batten Wall installation depends upon the dimensions of the wall and the spacing of the battens, so there is no such set parameter.

Tools and Equipment

Following are the tools that are employed for the wall decor with wood strips:

  • Level
  • Gap Filler
  • Brad Nails (30-40 mm)
  • Nail Gun
  • Angled Brush
  • Miter Saw
  • Tape Measure
  • Caulk
  • Construction Adhesive
  • Stud

Measurement Of Wall: Reckoning The Spaces Between Battens

You can estimate the spaces between the board and battens by this formula:

Width of the wall – (Width of individual panel X Total number of vertical panels) ÷ Number of wall spaces between vertical panels

For instance, pieces of wood were 15 in number and 5.4cm wide: Now, 15 X 5.4 = 81

Then, Subtracting it from the total width of the wall: 430-81 = 349

Now, Divide 349 by total spaces: 349 ÷ 14= 24.9 approximately equals to 25 cm .

So, I will create a space of 25 cm between all of the 15 wood panels.

How To Install Board and Batten Walls

There are two methods to make Boards and Batten Accent Wall:

  • Building From Scratch (Employment of Raw/Unprepared Wood)
  • Using Primed Wood

Step by step process

Following are the steps of its installation:

  • In the selection of plywood, go for oak, maple, cedar and pine. The most commonly used is pin
  • You will have to clean the wall and sand it, which is supposed to be renovated first. Use a coat of primer.
  • Take measurements of the wall, determine the spacing, mark the position of the timber, and then use construction adhesive to adhere the timber to the wall.
  • Use studs and nail the battens into the studs for a secure fit. Use a level and miter saw to make the battens equal in size to each other.
  • Bonus Tip: I prefer buying primed pines as it saves time, though it is quite expensive as compared to the other one. Always try to buy the pine that is most straight.
  • Using a brad nailer can significantly speed up the installation process, providing a clean finish without the need for excessive sanding.
  • Bonus Tip: Make sure to do caulking by applying the caulk!
  • In addition to this, consider painting the battens before installation to achieve a professional look with minimal mess.
  • You can opt for paint or stain of your own choice. For best aftermaths, apply two coats of dyes


Whenever bedrooms come to mind, we think that it is a place to sleep only. But your bedroom is more than a place to sleep; it’s your personal retreat for actual rest, mental clarity, and a place where productive ideas like morning journaling and planning the day emerge.

The way you design this space actually matters because it can impact your health. For example, calming colour combinations like soft blues can lower heart rate and improve sleep quality according to research on colour psychology and sleep, while the cluttered spaces spike stress.

Small bedrooms often feel suffocating if not thoughtfully organised, whereas larger spaces can end up feeling cold and empty without smart zoning.

This comprehensive guide explores sophisticated bedroom interior decor ideas, spanning from sleek contemporary aesthetics to warm, intimate sanctuaries, including innovative space-maximising solutions and refined luxury styling approaches.

Bedroom Styling Tips for Everyday Wins

Styling the space where one spends most of their peaceful time is crucial. So, start with layers, blend textures like linen bedding and mohair throws to adopt 2026’s popular cocoon-inspired trend.

To maintain natural flow, arrange your furniture purposely, and try to float your bed away from walls for openness in large rooms.

Keep it clean by making hidden storage under beds, because a tidy setup instantly elevates mood and makes day-to-day maintenance simple.

Bedroom Wall Decor That Creates Real Impact

When styling the interior of your bedroom, wall decor cannot go unnoticed. It acts as a visual focal point of your room without overwhelming the space. For timeless, classic contrast, try designing gallery walls with framed artwork in black-and-white bedroom themes.

You can strategically place metallic mirrors in the luxury dark-blue bedroom to bounce light off the navy walls. This technique is also a staple when designing a sophisticated seaside-themed escape, as it mimics the reflective quality of water.

And for grey bedroom ideas, textured wood panels or nicely placed floating shelves give architectural dimension without adding visual clutter.

Dark and moody bedrooms benefit from dramatic artwork with deep frames that enhance the intimate atmosphere, while creamy white bedroom spaces shine with minimalist line art or botanical prints that maintain the airy, serene aesthetic.

Room Decor for Teens: Fun and Functional

Teens nowadays crave personalisation, a space that reflects their unique personality. For teens, pairing bold patterns with modular shelving systems that evolve alongside their changing interests creates the perfect balance.

Everything from homework assignments to gaming marathons is handled by a dedicated bedroom office ideas section with built-in desk space; add adjustable LED strip lighting for immediate mood control.

Washable area rugs and multipurpose storage ottomans that hide equipment from view will help you keep everything tidy.

Bedroom Ideas for Couples: Designing Shared Harmony

Your focus should be symmetry, with matching nightstands on either side of the bed and a central area rug that delineates the sleeping space. Adjustable dimmers and velvety headboards naturally promote passion and intimacy in dark and moody bedroom settings.

To preserve personal space while fostering harmony, consider adding distinct closet zones or a shared vanity area. To maximise productivity in shared spaces, you can create seamless hybrid zones with Murphy beds that fold into wall-mounted desks, saving floor space.

Install wall desks with cable hides in a bedroom nook to create a tidy, clean bedroom look. Dark green or grey acoustic panels reduce echoes and maintain crisp focus.

Colour Trends: Moody to Minimal

  • Luxury Dark Blue Bedroom: Deep navy shades with gold accents encourage deep sleep through soothing brain effects.
  • Dark Green Bedroom: Rich velvet greens and natural wood tones create a psychologically balanced environment that is inspired by nature.
  • Grey Bedroom Ideas: Extremely adaptable neutral bases that layer exquisitely with delicate colours; add sculptural statement frames for a modern edge in 2026.
  • Dark and Moody Bedroom: Several lamp sources should be layered with heavy drapes to create the sensation of an intimate cocoon; silk wall coverings can even reduce background noise.
  • Creamy White Bedroom: Adding a variety of textures with bulky knits and woven pieces will avoid becoming boring and maximise light in tiny areas.

These adaptable colour schemes can be used in any size bedroom; larger spaces typically favour darker hues, while smaller spaces naturally favour lighter ones.

Common Design Mistakes to Avoid

Overloading small spaces with excessive furniture could block natural flow, so only stick to necessary pieces. Overlooking colour psychology in a moody setup leads to mental exhaustion. So it is important to strike a balance between reflective metallic accents and deep darks.

Beautiful, luxurious, dark blue bedrooms quickly become dirty when regular care is neglected; instead, start with fabrics that are resistant to stains and can be easily cleaned.

Practical Implementation Steps for Every Budget

Here are some practical implementation steps for every budget segment, if followed correctly, yield the best results:

First, you have to declutter ruthlessly to establish a clean bedroom starting point. Then comes the paint; always test colour swatches in natural light.

After that, layer the textile carefully, starting with bedding and throws. The fourth step on the list is to personalise with meaningful accessories, like framed photos for teens and art for couples.

Lastly, install lighting like adjustable dimmers. They can enable flexible mood atmospheres.

FAQs

How do I maintain a clean bedroom daily?

Establish a fast evening surface wipe-down procedure and use eye-catching baskets to catch stray things during the day.

What works best for room decor for teens?

Select modular furniture, such as height-adjustable shelf systems, that will organically expand with them over time.

What are the Budget-friendly bedroom ideas for couples?

Install shared floating shelves for joint items and hunt for quality secondhand area rugs.

Why should I choose a dark green bedroom?

It psychologically evokes natural environments, promoting truly balanced, restorative rest.

In my 15 years of designing nooks, the biggest mistake I see is treating that unused corner of a bedroom as dead space. Why leave it empty and boring when, with some effort, you can make it your cozy and dreamy room within a room?

The ideas below cover every budget, room size, and style. Each one is something I have designed and installed in the homes of my clients.

1. The Classic Reading Nook Tucked into a Bedroom Corner

The Classic Reading Nook Tucked into a Bedroom Corner

A built-in reading nook is the most requested project in my studio, and for good reason. It transforms the awkward 90-degree corner of a bedroom into a personal retreat that feels like it’s been there forever.

  • Use L-shaped shelving to frame the seat on both sides
  • Add a wall-mounted swing arm lamp. It will save the table space.
  • Choose a seat cushion at least 4 inches thick for long reading sessions
  • Install a small outlet inside the nook for phone charging

Pro Tip: Paint the interior walls of the nook 1-2 shades darker than the room. This depth trick makes the alcove feel intentionally designed.

2. Window Seat Bedroom Nooks

Window Seat Bedroom Nooks

A window seat nook is my go-to recommendation when someone has a deep bay or bump-out window they’re not using.

I recently designed one with a 16-inch deep storage base. It was perfect for extra bedding, seasonal throws, and books.

Pro Tip: Pair window seat nooks with dark wall colors behind the seat. Navy or deep green walls make the bedroom nook feel like a jewel box.

3. A Canopy Bed Nook for Some Drama

A Canopy Bed Nook for Some Drama

It’s one of the most sophisticated bedroom nook ideas for adults I’ve executed. The idea is to create a “room within a room” by building a canopy frame around the bed. Then you can add layering curtains that can be drawn for full enclosure.

Pro Tip: Pair the canopy with a moody color palette on the back wall, and you get a retreat that feels genuinely luxurious.

4. Create a Built-In Bookshelf

Create a Built-In Bookshelf

A built-in bookshelf nook in a bedroom does something shelving alone can’t: it creates a sense of enclosure that makes the space feel curated. I always design these with the shelves flanking a central focal point. It can be a chair, a bench, or even the headboard itself.

Pro Tip: The key measurement I use: keep shelves 10–12 inches deep for standard books, but bump one shelf to 14 inches to accommodate art books and display objects. That variation in depth makes the whole unit look more thoughtful. For more layered ideas, you can browse my different nook design approaches that go beyond the obvious.

5. Home Office in a Bedroom Nook

Home Office in a Bedroom Nook

A bedroom office nook is one of the most practical projects I get hired for, especially in studio apartments and smaller homes. The goal is always the same: create a workspace that functions fully during the day and visually disappears in the evening.

My go-to approach is a floating desk built into a shallow alcove. I’d suggest going for 22–24 inches deep. It is the sweet spot for a monitor and keyboard without the desk dominating the room.

Pro Tip: You can decorate this office nook with the shelves, small indoor plants, table lamps, and pedboards.

6. Under-Stair Bedroom Nook

Under-Stair Bedroom Nook

Under-stair bedroom nooks use triangular dead space that most homeowners ignore entirely. I always advise my readers to turn that space into a small reading pod, a workspace, a secret teen bedroom for your kids. It will give you a kind of Harry Potter vibe, and believe me, you will love it.

Pro Tip: Use shelves that follow the stair pitch. It will make the slope look integrated. Position the headboard at the tallest end and feet towards the slope for maximum utilization of space.

7. A “Zen” Nook

A “Zen” Nook

Place the large mirror and hang fairy lights in the corner. The mirror doubles the perceived space and bounces the warm glow of the candles and salt lamps throughout the corner, which looks stunning.

This feels less like a reading spot and more like a space for meditation, journaling, or winding down before bed.

Pro Tip: I’d suggest placing a rough, natural jute rug underneath a soft, shaggy faux-fur or wool rug. The contrast between “rough” and “soft” creates a sensory depth that makes a nook feel high-end.

8. Install an aerial furniture in the Corner

Install an aerial furniture in the Corner

You can use a macramé hanging chair as your focal point. Hang pathos and other low-maintenance plants around it from the ceiling or sit on high shelves.

Pro Tip: Position your hanging chair in front of a tall, structural plant. It creates a “green wall” effect and adds more character to the room.

9. Couples’ Bedroom Nooks: Designing for Two

Couples' Bedroom Nooks

One of the most rewarding projects I take on is designing bedrooms for couples, especially when two people have genuinely different needs from their space. One wants a reading seat, the other wants a vanity. My solution in most cases: one nook per person, positioned on opposite sides of the room.

Pro Tip: Use the same wood tone or upholstery color in both nooks to tie them together visually, even if the function is completely different. This kind of symmetry is a hallmark of well-planned master suite interiors where comfort meets high-end design.

10. The Floating Nook Design

The Floating Nook Design

Let’s say you have an extremely small nook area where you can’t really put any sofa or mirror. What would you do then?

I have a solution for that. Place a small chair and install floating shelves in the corner. Make sure to mount the corner unit slightly off the floor. It will not look “heavy” like the traditional furniture.

For more flexibility in tight spots, using a compact gateleg table offers the same light appearance while giving you a fold-out surface for tea or a laptop whenever you need it.

Pro Tip: Use matte finish and a sophisticated color palette of sage green, light oak, and cream to give it a more open and airy vibe.

Closing Thought

The thing about a well-designed nook is that it changes how you inhabit your whole room. You start going to bed earlier because you actually want to be in your bedroom.

You read more, breathe a little easier, and eventually get a relaxing sleep at the end of the day.

You Might Also Like:

Wall Art Design ideas

Black and White Bedroom ideas

Decorating a small room is something I’ve become professional at. Since I have a small space, I need to keep the decor smart and functional so it does not look cramped.

Decorating a small room beautifully comes down to four things: 

  • Smart furniture choices
  • Controlled color
  • Intentional lighting
  • Keeping visual clutter low

But that’s not all. Let me show you the clever ways you can decorate your small home while keeping it practical and functional.

1. Stick to a Cohesive Color Palette

When walls, furniture, and soft furnishings share a close tonal family, the eye travels smoothly across the room without stopping. But be careful not to color everything stark white. It can often feel cold or unfinished. When you stick to a cohesive color palettes, you don’t have to worry if a new pillow or picture frame will match.

Quick Tip: Paint your ceiling the same color as your walls (or one shade lighter) instead of trimming the dark and light shades. For example, considering dark blue for your small bedroom walls gives you the sense of removal of the hard horizontal line that makes ceilings feel low and room feel boxed in.

2. Smart Placement of Furniture is The Foundation of Small Room Decorating

You might not need any new furniture to decorate your small room. You already have enough. The point is to smartly place them in a way that feels open and spacious.

Here are some tips that helped me:

  • L-shaped arrangements (tucking seating into corners to save floor space while keeping areas conversational and airy).
  • U-shapes suit snug setups if one side stays open.
  • For narrow spaces, opt for slim profiles like micro seating or sectionals to maintain visual breathing room.
  • Test arrangements by ensuring easy traffic flow around doors and paths.

3. Use Fewer but Larger Decor Pieces

The mistake most people make is filling a small room with many small decorative objects. Multiple tiny things read as clutter. One large, confident piece reads as intentional design.

Practical swaps:

  • One large mirror instead of a gallery wall of small frames
  • One statement plant instead of six small ones scattered around
  • One oversized art print instead of multiple small prints
  • A single throw over the back of a sofa instead of multiple mismatched cushions

4. Layer Your Lighting for a Bigger, Warmer Feel

A single overhead light source flattens a room. It removes shadow and depth, which ironically makes a space feel smaller and more institutional. Layered lighting means having three types working together:

Light TypePurposeExamples
AmbientGeneral illuminationCeiling fixture, recessed lights
TaskFunctional lighting for specific areasDesk lamp, reading light
AccentDepth, atmosphere, vibeWall sconces, LED strip lights, table lamps

For small living room decor ideas, a floor lamp in a corner draws the eye upward and outward. It effectively expands the perceived boundaries of the room.

5. Turn Window Areas Into Cozy Nooks

For a small living room, you can transform recessed window areas into most-loved nooks by converting a window alcove into an office nook, installing built-in benches with custom cushions or by using a sofa or vintage chair for a reading corner.

Personally, I always prefer to design nooks with built-in benches with under-seat storage to use empty crannies and corners to store my leftovers. It helps to keep me organize my small room efficiently.

6. Use Vertical Space: Wall Shelves and Smart Storage

Shelving, hooks, and wall-mounted cabinets are the best options when you have a small home. It moves clutter off surfaces and floors without reducing the function of the room.

Smart Storage Ideas for Small Rooms

Beyond shelving, you can use these tips:

  • Command strips and pegboards in kitchens and home offices
  • Over-door organizers for pantries, bathrooms, and bedrooms
  • Magnetic wall panels for small home offices
  • Built-in cabinetry to the ceiling if renovating, the most efficient use of vertical space available

7. Add Plants to Bring Life

Plants are one of the few decorating elements that add life, warmth, and personality to a room without making it feel smaller, provided if they’re chosen and placed thoughtfully.

Best plants for small rooms:

  • Trailing plants (pothos, string of pearls) hung from the ceiling or placed on high shelves look perfect. They add greenery without taking up floor or surface space
  • Tall, slim plants (snake plant, fiddle leaf fig) that draw the eye upward
  • Small succulents grouped on a windowsill as a single, contained vignette

A tip from me: Avoid spreading small plants across every surface. Group them intentionally. One or two strong placements beat a dozen scattered pots every time.

8. Keep Walkways Clear

Creative small room decorating ideas are only effective if the room remains easy to move through. Blocked pathways are the single biggest reason compact rooms feel smaller than they are.

The practical rule: Every room needs at least one clear path, minimum 36 inches wide, from entry to primary seating or bed.

Final Thoughts

The best budget for small room decor ideas aren’t about cheap substitutes; they’re about understanding that restraint, cohesion, and function are the actual design principles at work. A room that’s been thoughtfully edited always feels more spacious.

The living room is the heart of the house. Whether you want to have an uninterrupted rest after a long day at work, entertain some friends, or binge-watch the latest Netflix series, the living room is the place to be. With so much use, the living room is susceptible to generating dust and clutter. The WebMD names it the third germiest place in a house after the bathroom and kitchen. This is mainly because of the upholstery, which is a breeding ground for allergens and bacteria. The fabrics are exposed to unwashed hands, sneezes, and dirt from shoes and feet. Therefore, in your house cleaning checklist, living room should be on top priority. That’s where this article comes in.

Living Room Cleaning Tools

The first step is assembling your weapons of warfare. Remember, this isn’t a 10-minute-quickie where you speed clean because your parents are coming over. The goal is to get tools that will allow you to clean nooks and crannies with ease. Most of these tools are also effective for tasks like kitchen deep cleaning.

Below are the must-have tools:

  • Vacuum cleaner (preferably with attachments for different surfaces)
  • Window cleaner (you can DIY it)
  • Microfiber mop and bucket for hard floors
  • All-purpose cleaner
  • Scrub brushes and duster
  • Carpet cleaner or extractor
  • Gloves
  • Baking soda in a shaker
  • Wood cleaner/conditioner
  • Microfiber cloths (both multipurpose and glass-only)

Where to Start your Cleaning up Living Room

1. Gather Trash And Declutter The Living Room

Before you start deep cleaning, you should first declutter the room and remove trash. Decluttering is a great idea if you have energetic kids who tend to toss things everywhere or if a wild party leaves your room in disarray. Start by removing toys, video games, papers and clothes, utensils, clothes, books, and anything else that doesn’t belong in the living room. You should also collect all the trash.

This includes leftover foods you didn’t put in the fridge, unopened mail, and wrappers. Get rid of items you rarely use that take up space in your room. If you can’t gift them or find a use for them, tossing them out is better.

2. Dust The Living Room

This is where you bring your microfiber cloths into action. But be prepared to turn your living room upside down. You’ll have to remove all the books from the shelves, book jackets, wall decorations like pictures, and even the household ornaments and artwork scattered across the living room. Dust them thoroughly using the microfiber cloth or duster.

For electronics and devices, use a different cloth and wipe gently in one direction to avoid streak marks. Make the electronic cleaner using an isopropyl alcohol (IPA) solution. The solvent dissolves light oils, fingerprints, and flux residues, notorious in home electronics. Remember the air vents and window blinds. These areas gather dust quickly, so it’s wise to include them on your living room cleaning checklist.

3. Deep Clean Sofas (And Other Seats)

This is the step you bring in the vacuum cleaner with an upholstery attachment. You also need a cleaning solution of your choice. Just be sure to avoid using strong chemicals if you have pets or toddlers, as they could be affected. Start by vacuuming the sofas thoroughly. Place the upholstery under cushions and crevices to remove crumbs, pet hair, and dust.

Mix a cup of warm water with white vinegar in a spray can to remove hard stains. Gently dab the stain with a cloth, starting from the edges and moving inwards to prevent it from spreading. You’ll note odors from the chemicals used in the process. Baking soda works perfectly to get rid of the smell. Sprinkle it over the sofa and let it rest for half an hour before vacuuming it.

4. Re-arrange Your Sofas, Electronic Equipment And Coffee Table

Remember the last time you visited your friend and thought they bought new stuff, only to find they’ve changed the living room layout by moving it around? You can do the same while deep cleaning your living room. As you clean the nooks and crannies where you’ve placed your equipment, coffee tables, and sofas, this is an opportunity to change the layout of your living room.

You’ll not only clear dust from those tricky spots but also have the chance to reimagine your living room layout. Just ensure the new setup keeps the space accessible for cleaning and organizing in the future. Moving heavy furniture often reveals hidden scuffs or older spills; if you notice any discoloration on your flooring during this process, knowing how to remove dark stains from wood floor surfaces can save you from a costly refinishing job later.

Many homeowners find that a cleaner, more organized space is the perfect canvas to experiment with new color palletes, such as: relaxing and calm vibes you may try creamy, light pink or olive green, dark and moody colors for energetic or design it in farmhouse style, which relies on a clutter-free and functional layout to truly shine.

5. Clean The Walls

The walls are the most forgotten places when deep cleaning the living room. They quickly pick up dust and stains, especially if you have toddlers with sticky “Spider-Man” hands. The cleaning approach is the same whether cleaning a white or expensive wooden wall. Start by taking down any artwork or pictures from the walls. If there are cobwebs, use a broom to sweep them away. An extendable duster can help you reach those high corners with ease. Once done, the next step involves using a microfiber cloth or sponge. Soak them in warm water and gently rub the walls.

Use a product like a magic eraser to clean tough stains from the wall. They work well, removing tough stains without compromising the wall paint. Cleaning walls in the living room can also be applied to other rooms in the house. Whether it’s bathroom deep cleaning to tackle stubborn mildew or kitchen deep cleaning to remove grease stains, a consistent approach keeps every room spotless.

Read Also: How to Eliminate Bathroom Quickly

Conclusion

Deep cleaning of the living room is a tiring process. But you don’t have to wait till it looks like a dumpsite before you take action. It’s recommended that you take a “little but often” approach. This can be a daily 10-minute cleaning of the “seen areas.” You can also advise your household members to be wary anytime they’re in the living room. They can wipe spills as soon as they occur and ensure the place is always tidy. But as I said earlier, a 10-minute quickie can’t keep the living room spotless for long. Dedicate at least one day per week where you go all in with a thorough, deep clean.

Cleaning pavers around the pool is not only about sanitation. More importantly, it’s about the aesthetics and value of your house. A lack of thorough cleaning will result in discoloration, dullness, and cracking on the pavers’ surfaces. This will ruin all your efforts in selecting attractive paver ideas and laying the pavers. Make your pool unappealing and also reduce the market value of your house. Several reports have shown that swimming pools with maintained paver areas increase the price of the house by 15 to 25%. So, if you want to maintain the value and the aesthetics of your home, all you have to do is clean and maintain your paver area.

10 Tips To Clean The Pavers Around Your Pool Properly

Here’s a detailed list of steps that will guide you on the best way to clean pavers around the pool.

1. Get The Required Supplies

Before starting paver cleansing, ensure that you have all the supplies you require during the procedure. This step will allow you to proceed with all the other cleaning steps smoothly, so let’s have a look at all of these required essentials:

  • Detergent
  • Garden hose
  • Bucket
  • Broom
  • Scrub Brush
  • Dry mop
  • Sealant

2. Clear The Area

Remove all the obstacles, including furniture, decor items, and any other thing that can offer hindrance to the cleaning process. The dispersion of the random items around the pool will distract you during the washing of the pavers and drain all of your energy. Therefore, it’s always a good idea to start your cleansing with this preparatory step as it allows you to go smoothly with the next steps.

3. Remove The Dirt and Debris

Get a broom and sweep all the loose dirt and debris off the paver area. Ensure that you have cleared all the debris and dust particles, including leaf residues and used wrappers. This step will also help you prevent the spread of dust and dirt in the washing step. Furthermore, if you find a stain-producing substance present in the area, clean it before you apply water.

4. Prepare The Detergent

Select the detergent that suits perfectly according to the type of paver. You’ll find the different detergents for concrete, brick, and stone pavers. It’ll be the best idea if you choose biodegradable or eco-friendly detergents. If you’re looking to clean pavers naturally, try using vinegar, baking soda, and some of the essential oils. These natural agents can also be used for removing the molds from the pavers. Furthermore, don’t try to use the pool coping cleaner on the paver surfaces. After getting an efficient detergent, dilute it in water. Must keep the manufacturer’s instructions in mind when diluting the detergent.

5. Wash and Scrub

Rinse the pavers before applying the detergent. Follow a uniform pattern when you apply the diluted detergent on the paver surface. Then, use a scrub brush to remove the stains and dirt from the area, along with the detergent. If you find some tough stains, prefer using concentrated detergent. Besides, try to scrub the tough stains more forcefully to get a completely cleaned area. Just remember that your efficient cleansing skills in combination with a compatible detergent will give you the satisfying results enough to make your day.

6. Rinse Thoroughly

Once you’re done with the treatment of stains and dirt with detergent solution, wash the area thoroughly with sufficient water. For thorough rinsing, it is always the best option to use a garden hose. Otherwise, you can use a large capacity bucket for washing purposes, but it can prove tiresome for you. Regardless of which option you choose, use enough water to completely remove the detergent and dirt particles.

7. Recheck The Area

Let the pavers dry and recheck the entire area. Find out if there are any dirt or stain remnants. In most cases, oil stains become difficult to remove. They become nearly invisible during washing, but can be clearly identified once the surface becomes dry. So, if you find any kind of spots making your pavers unappealing, apply the detergent again, wait for a few minutes, and wash thoroughly.

8. Apply The Sealant

The next step is to apply the protective sealant. It will prevent the pavers from any more stains and damage. Select the compatible sealant. You can go with the acrylic or epoxy sealants, depending on their protective abilities and resulting appearance. Clean the area thoroughly and then wait for the paver area to dry before applying sealant. Now, apply it by using a brush, roller, or sprayer. Let it dry for a sufficient time, as mentioned by the manufacturers.

9. Maintain The Pavers

After the thorough cleansing, try to maintain the pavers by avoiding tough stains and permanent damage. Keep seasonal cleansing in mind. In addition to this, consider the overall appearance of your yard; knowing how to get a green lawn can significantly enhance the beauty of your clean pavers. Develop the habit of inspecting the damaged area regularly. If you find any deterioration, repair it immediately. Similarly, take immediate steps for cleaning if you accidentally make stains on the pavers. All of these precautions will maintain the paver’s integrity and its attractive appearance.

10. Use a Pressure Washer for Deep Cleaning

For a quicker and more efficient clean, consider using a pressure washer on your pavers. The high-pressure water stream can remove stubborn dirt, mold, algae, and stains that scrubbing might miss. Just make sure to use the correct nozzle and maintain a safe distance to avoid damaging the paver surface. Pressure washing once or twice a year can keep your poolside looking fresh with minimal effort.

Final Thoughts

You need to maintain the attraction and integrity of the pavers around the pool by ensuring their thorough cleansing after a specific period. Prefer using eco-friendly detergents or natural compounds to remove the coagulated dirt and tough stains. Once you’re done with cleansing, apply sealant on the pavers and maintain with care and precautions.

If you have accidentally spilled anything on your hardwood floor that left a stain, it’s a problem that requires immediate action. You must act quickly, otherwise it will be difficult to clean the floor without causing damage.

Most people don’t realize that hardwood floors have a porous surface even when polished. If stains are not removed promptly, they will settle in and make your floor look unattractive.

But there’s no need to worry; common household stains can be treated with homemade remedies without using harsh chemicals. For this reason, we have prepared this extensive guide on how to get stains out of hardwood floors.

Basic Supplies to Remove Stains from Hardwood Floors

There are a few basic supplies that you will need to remove stains from a wood floor.

It includes:

  • Vinegar and water solution
  • Baking soda paste
  • Hydrogen peroxide
  • Clean microfiber cloths
  • Soft-bristle brush
  • Mineral spirits (optional, for tough grease)
  • Detergents
  • Dust Mop
  • Lemon Juice

Although the above-mentioned supplies are available at home, it is recommended that you perform a small-scale test of each of the supplies before applying them to a larger surface. This will ensure good results.

Certain important steps are needed to remove different types of stains. So, in the process of removing the stain, you must know the type of stain you want to remove. The most common types of stains and how to clean them are discussed below.

1. How to Remove Pet Stains From Wood Floors

How to Remove Pet Stains From Wood Floors

People with pets are well aware of this kind of stain. Pet stains on the wooden floor happen due to the chemical reaction of urine and bodily waste. Enzymatic cleaners are considered the most effective solution for pet stains.

However, to temporarily eliminate the smell, you can use baking soda or vinegar. Baking soda is also of use if you want to deep clean your kitchen.

How to Use:

  • Vinegar Solution: First, fill a spray bottle with equal parts vinegar and water, then apply the mixture to the affected area. After applying, wait for the results.
  • Baking Soda: For this, you have to sprinkle the baking soda over the stained area and let it sit for at least 10 minutes. Baking soda is also useful in removing stains from walls.

2. Ink and Dye Stains (Rubbing Alcohol or Hydrogen Peroxide)

 Ink and Dye Stains

Wood’s porosity is one of the main causes of ink and dye stains. It happens because the liquid penetrates the porous surface and leaves a mark. However, if you are wondering how to remove stains from a wood floor caused by ink and dye, we have a solution. Rubbing alcohol or Hydrogen peroxide can help treat ink and dye stains.

How to Use:

  • Rubbing Alcohol: It is quite easy to apply rubbing alcohol, you just need a soaked cloth with rubbing alcohol and gently dab on the stain. It is preferred over the ink stains.
  • Hydrogen Peroxide: Like rubbing alcohol, hydrogen peroxide is likewise very simple to use. The hydrogen peroxide-soaked cloth should be applied immediately to the discoloration.

3. Grease and Oil Stains (Dish Soap or Mineral Spirits)

Grease and Oil Stains cleaning in wooden floor

When grease or oil is spilled onto a wooden floor, it leaves this kind of stain. These substances are made up of lipids and are insoluble in water, and penetrate the surface. However, you can take steps to remove stains from wood imparted by grease and oil. Dish soap and mineral spirits are commonly used to remove stains from wood floors.

How to Use

  • Dish Soap: The application of dish soap is easy; rub it on the affected area and let it sit for a few minutes.
  • Mineral Spirits: Mineral spirits, on the other hand, are recommended for the stubborn stains. Its application process is to the point. Blot the stain with a small amount of mineral spirits.

4. How to Remove Water Stains from Wood Floors

How to Remove Water Stains from Wood Floors

Water stains are caused by the penetration of moisture into the porous surface. To remove water rings from the floor, you can use a dry iron or light sanding.

How to Use

  • Dry Iron: Set your iron on the lowest heat and slowly move back and forth over the surface with gentle pressure.
  • Light Sanding: You can use a fine-grit sandpaper and apply it to the wood floor in a circular motion.

5. How to Get Dark Stains Out of Wood Floor

How to Get Dark Stains Out of Wood Floor

This type of stain can occur due to water damage and sun exposure. So, to remove stain from a wood floor, use hydrogen peroxide directly on the stain and wait for 30 minutes. Next, use a gentle towel to dab at the area.

How to Use:

  • Hydrogen Peroxide: You can spray undiluted hydrogen peroxide directly on the stained area.

Wooden Floor Maintenance Tips

If you are reading this, then you must be a person who has either faced this problem or wants to avoid it in the future. So here are some maintenance tips that can help prevent your floor from future staining.

  • Use rugs in high-traffic areas
  • Clean spills immediately
  • Avoid excess moisture during mopping
  • Use furniture pads
  • Clean the floor monthly
  • Vacuum the floor Weekly

Keep in mind that regular care is a must to avoid future issues. When cleaning your house from top to bottom, you must clean your hardwood floor.

Final Thoughts | How to Remove Stains From Hardwood Floors

Although hardwood floors are sustainable, they can become stained over time if not properly cared for. The above tips on how to get stains out of hardwood floors can save you money. The methods discussed in the article and the steps to remove stains from wood are effective and can increase your floor’s life.