Author

Mohammad Saram

Browsing

The patio is like a hybrid of home and outdoors. It’s the space where soft pillows and clouds co-exist. However, the most important factor is the design of patios that make or break the game. It costs crazy to renovate the patio, but many people do it cheaply by using 2 options: either they choose cost-effective materials or DIY everything (from cutting the pavers to designing and installing decoratives).

For instance, Angela Rose, a fearless DIYer, revamped the stucco wall of the patio with thin-slat wood panels. She used redwood with a transparent stain to protect it. After testing out some options, she finalized the pattern and installed them horizontally. Then, this half wood paneling was decorated further with planters and pots.

4 Budget-Friendly Patio Paver Ideas to Makeover your OutDoor Space

Want to cut the expense and make your home dreamy like hers? I’ve collected some practical, budget-friendly yet stylish paver design ideas. So, let’s dive in!

1. Pavers with a Fire Pit, Sofa Chairs, and Some Grass or Gravel Around

Pavers With Grass/Gravel + Fire Pit + Sofa Chairs

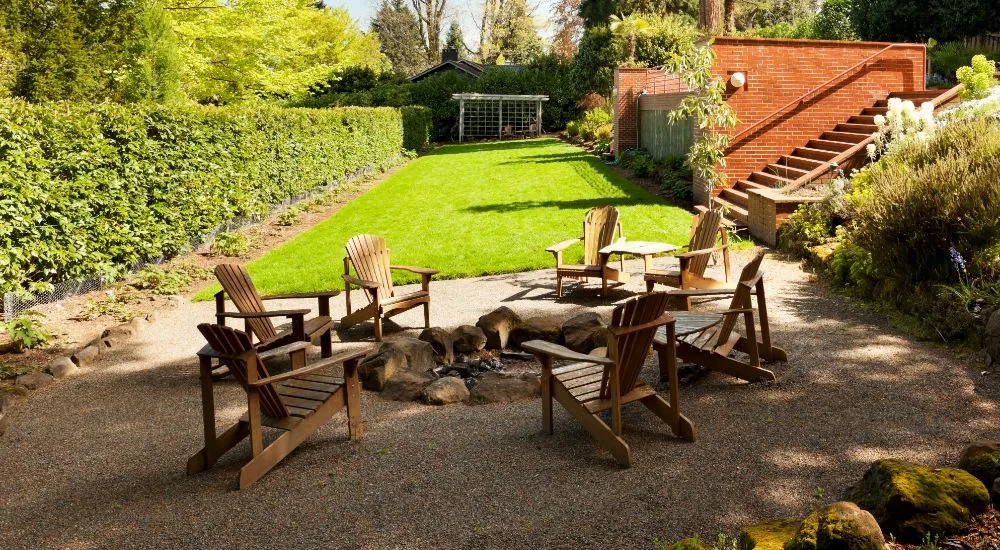
It might be one of the most popular backyard cheap patio paver ideas, but I still love it because of how timeless it is. Simple paver design is uplifted when you grow grass in between them or add gravel. If you are interested in keeping it all plain, I’d suggest laying some rug or cover to give it life.

It is an inexpensive option because the materials are readily available, and the design is easy to install. Moreover, it requires less labor to maintain. However, you’d need to lay your pavers correctly to make them last long. For the sofa chairs, you can get sofa chairs via seasonal sales or the clearance section.

Why We Love It:

It’s a kind of cozy spot where you’ll want to sip lemonade and scroll TikTok all day.

Budget Tips to Get This Look:

Use leftover pavers or gravel from previous projects, grow grass from seeds instead of pre-grown sod, use pea gravel, and install bricks or rocks on borders instead of expensive fancy edging.

2. Stamped Concrete Pavers with Dining Area and Sunroof

Stamped Concrete + Dining Area + Sunroof

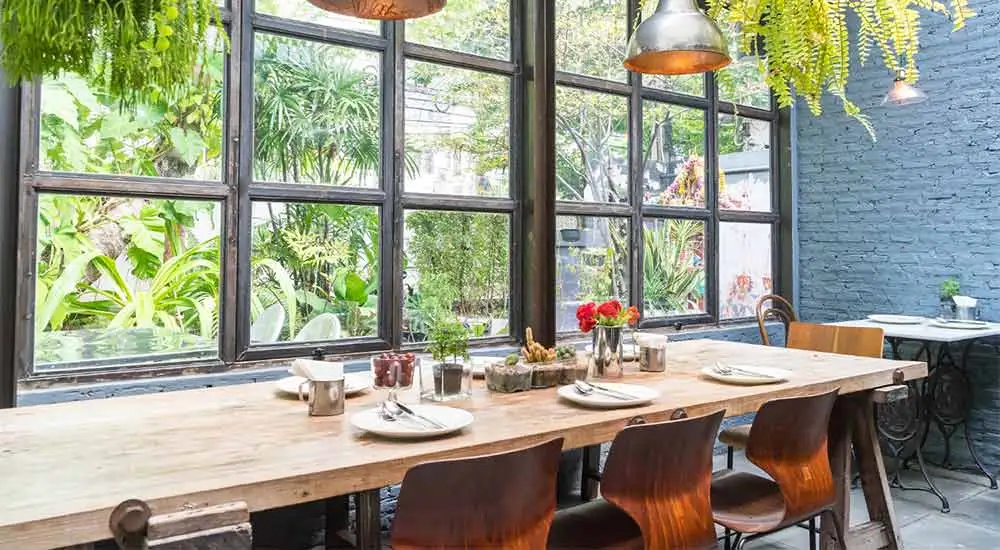
It is the best yet affordable patio paver idea because it can mimic the look of other materials as well. This design is not only modern and aesthetic but also durable, so you won’t need to call for assistance every other month to repair the patio.

Stamped concrete costs $9$13 per square foot. You can customize it and mimic the aesthetic of bricks or stone. Install a sunroof (Poly carbonate panels, retractable awnings, and fabric canopies are cheap options) if you want to make the patio more practical.

Why We Love It:

It’s Perfect for morning coffee, hangouts, and dinners.

Budget Tips to Get This Look:

Stamp concrete yourself; use concrete overlay; use solar-powered lights; install inexpensive wood, bamboo, or pipe for the sunroof structure, and make furniture cushions yourself.

3. Raised Garden Beds with Pebble Mosaic and Water Feature

Pebble Mosaic + Raised Garden Beds + Water Feature

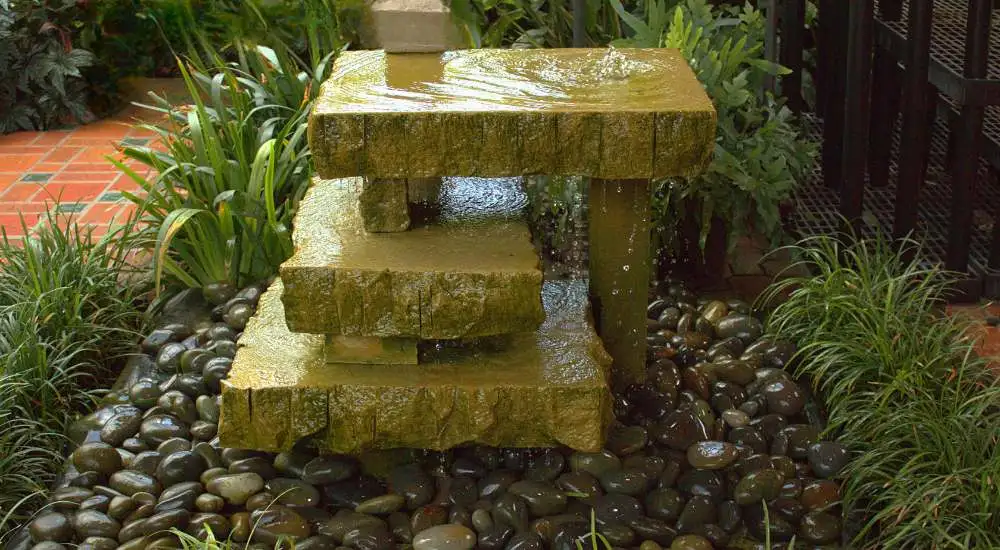
A pebble mosaic patio makeover is easy and inexpensive because you can buy pebbles in bulk or collect them yourself. Plus, it does not require much processing or preparation. The look is sophisticated and stylish for pathways, patio walls, and stepping stones.

My inner artist finds this cheap patio paver idea fascinating because I can make millions of patterns: sunbursts, checkerboards, fish scales, flowers, half moons, rainbows, etc. Just scroll through Pinterest to get more inspiration.

Raised beds and artificial water features are perfect for adding some greenery and nature to your patio and renovating your home completely.

Why We Love It:

These visually interesting designs don’t require more investment for any extra decor. The calming effects of water splashing from fountains make the patio serene.

Budget Tips to Get This Look:

Find good-quality pebbles from nearby hardware stores and use simple concrete adhesive to stick them down—no fancy tools are needed. Create raised beds with wood blocks and bricks lying around in your home instead of buying them pre-built.

  • PS: Pebble mosaic pavers get the most dirt and debris over time, so it’s better to clean the pavers regularly.


4. Multilevel Flagstone Patio Paver with Some Plant Decor and Outdoor Bar Area

A flagstone patio looks effortlessly grand and luxurious even if you design it in a simpler way. They are larger in size and flat, so you can easily use the space for socializing. People mostly install them in irregular patterns, edging with plants to create a natural lounge-like area. Complementing this with a well-maintained green lawn can truly elevate the outdoor aesthetic.

Since they have some gaps in between, you can incorporate gravel or moss to make it more dynamic. Experts suggest using small-size flagstones for elevated portions of the patio (wall or counters) and larger sizes for open areas (seating).

Over time, natural stone and flagstone patios can develop mold, especially in damp or shady areas. Regular maintenance and mold removal are key to keeping your patio looking fresh. And if your patio or poolside gets slippery or grimy, you can opt for cleaning poolside pavers to refresh the area in no time.

Why We Love It:

I love installing flagstone so that it has one level for seating with small tables and another slightly elevated level with a bar or coffee station.

Budget Tips:

If you are DIYing it, you can get the tools on rent, buy flagstones in bulk, keep the number of levels small and manageable, and keep the design simple.

It’s not just you who struggles with a patchy, unappealing lawn. Thousands of homeowners put in efforts to get a greener and healthier lawn. But, most of the time, a little negligence ruins all of their efforts.

Luckily, in this article, you will learn all the guidelines to get a greener lawn that not only looks exciting but also makes the environment healthier for you.

How To Get A Green Lawn?: Complete Guide to a Greener Lawn

The following steps will help you have a green lawn in your home.

1. Improve Your Soil Quality

Nutritional composition and pH are the two main factors that determine the quality of the soil. For grass growth, a pH of the soil ranging from 6.00 to 7.00 is considered optimal. It means that when you are thinking of growing grass in your lawn, the soil must not be too acidic or too basic. The change in soil pH hinders the nutritional uptake, thus hindering the grass growth.

So, if you find your soil pH is deviating from the targeted pH, use either lime or sulfur. Lime will increase the soil pH, and sulfur will decrease it. Besides pH, ensure that your soil provides the optimum nutritional content for the growth of grass. You can use organic matter to such as compost, with a mulch layer to improve soil quality.

2. Aerate Your Lawn

With time, soil gets tightly bound, which hinders the oxygen and nutrients from reaching the roots of the grass. Aeration helps in loosening the soil’s tightness and easing the uptake of essential minerals, water, and oxygen by the roots. You can select the grass aerator depending on your lawn. For example, the handheld aerator is considered good for the smaller lawns.

Ensure to water your lawn deeply before aeration. Also, clean your lawn, especially remove the hard materials, for a safe procedure. Further, find out the best time for aeration according to the type of grass. Usually, the grass growing season, spring or fall, is considered suitable for aeration.

3. Dethatch to Let Your Grass Breathe

The accumulation of the dead layer of the grass and roots can destroy your lawn’s growth. The thick, dead layer, of about half an inch, hinders sunlight and air from reaching the growing grass. So, whenever you notice that dead grass or roots are trying to cover your lawn, use a dethatched.

Before dethatching, mow the lawn and slightly water it. Water helps in loosening the rigid thatch. Then, use the dethatching rake and dislodge, collect, and remove the dead grass and roots.

4. Fertilize Gently and Wisely

You can’t select any random fertilizer, especially when you’re looking for how to make your grass green faster. Try to buy the controlled-release fertilizer from reputable manufacturers. Mowing the lawn a few days earlier can help improve the fertilizer’s penetration in the soil. Similarly, water your lawn about two days earlier.

For even spreading of the fertilizer, use an appropriate spreader according to your lawn type. Spreading in a grid pattern, particularly in the evening, is considered an optimal practice for fertilization. Don’t forget to water the lawn after applying fertilizers to accelerate their absorption.

5. Water Smartly and Deeply

A thoughtful watering technique can also help you make your lawn greener. Instead of watering frequently, try to water deeply once or twice a week. Whenever you water your lawn, ensure that water is reaching at least 6 inches down in the soil. If water fails to penetrate deep down, it will not reach the root system.

Aeration and deep watering can help in good penetration. Further, collecting rainwater for lawn watering is considered an eco-friendly approach. In addition, try to water the soil in the morning to avoid water loss by evaporation.

6. Mow the Right Way for Greener Grass

You’ll be surprised to observe how the strategic mowing accelerates the grass growth in your lawn. All you have to do is mow your lawn regularly and wisely with a sharp-blade mower. At the very first step, decide on the targeted height you want to cut, depending on the grass type.

Use the mower to cut the grass no higher than 1/3rd of the blade’s length each round. Then, reduce the cutting height of the grass in the next round. Also, try to change your direction each time you mow your lawn. After mowing, remove all the debris and leave the grass clippings to act as fertilizer.

7. Overseed Bare Patches

You can simply overseed the bare patches by spreading high-quality grass seeds on them. Prepare the soil by raking and cleaning the area before spreading the seeds. Then, evenly spread the grass seeds, rake again, and water the lawn. Ensure that you are using disease-resistant seeds that fill the gaps properly. Moreover, you can also add a mulch layer for efficient results.

8. Avoid Common Mistakes

Your little negligence can deprive you of the fruitful outcomes of your efforts. For example, if you overwater the soil, it will suffocate the roots, hinder their growth, and increase the risk of disease. On the other hand, if you underwater the soil, it will put stress on the grass and restrict sufficient growth. Similarly, cutting the grass too short will weaken it and increase weed growth. Furthermore, quickly remove the mold from pavers if you have them in your lawn. Your lawn isn’t the only space that needs attention, poolside paver cleaning is just as essential for a fresh, tidy outdoor vibe.

Grass Growing Tips

Grass Growing Tips

Here are some further tips for green grass growth:

  • Add magnesium to get greener grass blades.
  • Use grass clippings as a natural source of nitrogen.
  • Add some wetting agents if the soil is dry.
  • Use compost tea for accelerated grass growth.
  • Mow with sharp blades when the grass is dry.

Read More: 4 Cheap Patio Paver Ideas to Style Your Outdoors Space

Pro Tip: High-Impact Lawn Care Suggestion

Adjust the soil pH and maintain its nutrients. Aerate and dethatch your lawn regularly to optimize oxygen and mineral penetration and uptake. Spread the nitrogen-rich fertilizer evenly on the soil. Water deeply without overwatering the soil. Mow your lawn regularly in alternate directions.

Conclusion

Now, you must be clear about how to make grass greener. The quality of the soil decides whether you’re going to get a greener lawn or not. So, all of your struggles should be focused on improving the soil’s quality for healthy grass growth. Use nitrogen-rich fertilizers and other organic matter with proper aeration. Never let the dead grass and roots cover the lawn surface. Lastly, water your lawn deeply and mow it wisely.

Bedroom wall decor reflects personal style. That’s why some embrace bold, maximalist wall art, while others prefer a minimalist style. For instance, Katie Sharpe, an interior designer and blogger, decorated her son’s bedroom with an accent wall in a shiplap paneling design. It looks extremely fine and polished. We spend almost 35.9% of our day in bedrooms, which is almost 8 hours. So, you need to make it comfy and warm. Get inspiration from these trendy bedroom wall ideas to do so.

Top 10 Unique Bedroom Wall Decoration Ideas

The list has various modern wall decor ideas for bedrooms, so you can DIY them in any way you want. With these bedroom decor ideas, you can customize your space to reflect your unique taste while keeping functionality in mind.

1. Modern Geometric Wall Art

Modern geometric wall art

If you have a plain bedroom wall, you can easily decorate it with some geometric wall art. Hang geometric print canvases with precise lines and intricate patterns. You can also pick abstract representations of faces and animals using geometric shapes. It adds more character to the walls.

2. Design a Contemporary Gallery Wall Above Your Bed

Bedroom Wall Ideas

Gallery wall layouts are perfect if you have white walls in your bedroom. You can install abstract art, personalized family trip photos, textile art, or even the same images in frames. Either keep the frame sized the same or unbalanced. Both styles would work.

3. Stone Wall for a Rustic Look for Your Bedroom

Stone Wall for a Rustic Look

Crafting an intricate mural on the wall above your bed might take a bit more effort, but it will look incredible. If you want something easy to install, get floral carved stone wall hangings. If you love textured walls, you would like them as well. For more variation, you can get wood walls. This design looks totally Indemonstrable with a rustic vibe. Just ensure that you clean the wood panels properly every now and then to increase their life.

4. Unique Bedroom Wallpaper Ideas for a Timeless Traditional Look

Unique Wallpaper for Bedroom

It’s 2025, but people are still using unique wallpapers to decorate their couple bedroom walls as they are evergreen. You can create a beautifully stunning bedroom accent wall with trendy wallpaper designs. Some of the most popular options are:

  • Rust-colored patterns for a vintage vibe.
  • Full-length floral art for a maximalist feel.
  • For kids’ bedrooms, pick a scribble design or doodle design wallpaper and make it an accent wall.
  • Combine simple wallpaper with board and batten wall decor for a modern bedroom.

You can install wallpapers on your own as well. But make sure to clean the bedroom walls first for a hassle-free and smooth installation.

5. Keep It Minimalistic With Whites, Beiges, and Blush Tones

wall Art and decorative with simple lines

This one is my personal favorite. You can never go with minimalistic walls. Just pick the wall art and decorative with simple lines, keep everything low-key, and BOOM! Your bedroom will become a perfect place to be. Also, try to get white decor in your living room to compliment the bedroom’s style perfectly. If you work from home and have a bedroom office in your home, these color tones are perfect for your workspace as well.

6. Macrame, Tapestries, and Antique Frames for Boho Bedroom Design

Macrame, Tapestries, and Antique Frames for Boho Bedroom Design

Macrame is another evergreen and one of the best wall decorations if you love a natural vibe. Hang multiple smaller macrame pieces at varying heights to create a layered look. You can also include lush green plants like pothos or ferns in these ropes and make them more aesthetic.

7. Scandinavian Style With Neutral Colors, Shelves, and Greenery

Scandinavian Style With Neutral Colors, Shelves, and Greenery

The best way to decorate your room with simple things is to hang some floating shelves, warm light fixtures, and simple frames. Scandinavian style focuses on simplicity, functionality, and a natural look, which is perfect for a couple’s bedroom decor.

Plus, if you work from home and want to integrate nature into your bedroom office, this design is the best option to go for.

8. Raw Industrial Vibe With Metal Wall Art or Exposed Bricks

Raw Industrial Vibe With Metal bedroom Wall Art or Exposed Bricks

For industrial aesthetic bedroom decor, you have multiple options. Pick finishes like matte black, brushed steel, or rustic bronze for a gritty feel. You can also install some track lighting to emphasize the metal art and create dramatic shadows.

9. Oversized Wall Art or Frame to Give It an Eclectic Vibe

Versized wall art for bedroom wall

Eclectic wall ideas for your master bedroom are for you if you are a fan of maximalist decor. It includes oversized frames, tapestries, statement lights or lamps, and vibrant patterns on walls. For a similar aesthetic that adds architectural interest and can be customized with various colors, consider half wood paneling makeover designs to give your walls a refreshed look. With everything so grand, people like to add plants or botanical prints to soften the eclectic look.

10. Straw Hats Wall Hangings for Farmhouse Teen Bedroom Ideas

Straw Hats Wall Hangings for Farmhouse Teen Bedroom Ideas

Colors have a strong impact on mood and mental health. Soft pinks and calming browns are perfect for a farmhouse-style wall design in your teen’s room. You can also add fun accessories like decorative pillows with quirky designs or wall art featuring inspirational quotes. For those interested in a rich, calming ambiance, a palette featuring dark green bedroom concepts can truly transform a space.

What are the Best Wall Decorations For Your Bedroom?

Bedroom walls are generally calming and have a comfortable vibe. But you can decorate them the way you want. Hang a self-portrait, install mirrors, get decorative shelves, or install a giant mural as an accent wall. Design your bedroom the way you like. Make sure it depicts your persona and has a cozy feeling to promote restfulness and sleep.

You’d think it would be unusual, but mold grows more easily on pavers than you’d ever consider. Either they can be your patio areas, driveway, or front porch; if you keep your pavers damp and moist, you’ll find mold there. It’s good hygiene to keep every corner of your house clean, including your pavers, and removing mold from your pavers is as easy as boiling eggs.

In this guide, you’ll learn about practical, no-brainer techniques for cleaning and removing mold that guarantee your pavers are mold-free and looking their best. Whether you prefer natural solutions, household items, or commercial cleaners, we’ve got you covered!

Why Does Mold Grow on Pavers?

Why Does Mold Grow on Pavers

Mold growth mainly occurs because pavers are often made of porous material that absorbs water, leading to a moisture buildup on the pavers, resulting in mold later on.

Environmental conditions contribute to water seeping into pavers. The humid weather poured rain, and the organic materials like leaves, dirt, and other organic debris are the cherry on top for a recipe for solid black mold.

Some people prefer to lay pavers in the shade, which prohibits sunlight from accessing them, and thereby, the moisture does not evaporate and hence gradually accumulates health-hazardous and quite unattractive-looking mold.

Just as you want your pavers to look good, you can also learn how to achieve a lush, green lawn for a complete outdoor transformation.

Quick and Easy Methods to Clean Mold From Pavers

Removing mold from pavers seems to be a task that’s too big for anyone, but it doesn’t have to be. There are many fast and easy ways to remove mold from pavers.

1. White Vinegar Solution

Removing mould from pavers vinegar

White vinegar is a natural, non-toxic mold killer that’s environmentally friendly and inexpensive. The acidity breaks down the mold growth, cleaning your patio pavers, and leaving them clean and fresh.

How to use it?

  • Fill up the spray bottle with undiluted white vinegar.
  • Drench the areas liberally affected by the mold.
  • Wait for 30-60 minutes.
  • Clean every nooks and crannies with a brush and flush with water.

2. Baking Soda Paste

Baking Soda Paste

Baking soda is an all-natural, eco-friendly solution for removing mold. The alkaline nature of baking soda not only removes mold from pavers but also prevents its regrowth, so it is a safe and effective solution.

How to use it?

  • Stir into a thick paste with baking soda and water.
  • Apply the paste to the moldy spots.
  • Scrub the area using a brush followed by water.

3. Hydrogen Peroxide

hydrogen peroxide to clean pavers

Hydrogen peroxide is one of the powerful, eco-friendly solutions for resistant mold. The solution kills the mold without creating any harmful fumes, hence safe for application indoors and outdoors.

How to use it?

  • Pour 3% hydrogen peroxide directly on the moldy surface.
  • Let it stay for 10-15 minutes.
  • Clean the area and then rinse well.

This versatile cleaner is powerful for outdoor stone, much like it is when used as a gentle remedy for lifting tough wood floor stains without damaging the finish.

4. Bleach Solution (For Severe Cases)

Bleach Solution (For Severe Cases)

The best way to clean pavers is through the use of bleach. Bleach is a very effective disinfectant that can kill mold and bacteria within a short time. However, it has to be used with caution so as not to damage surfaces or harm plants.

How to use it?

  • The ratio of bleach to water to kill mold must be 1 part bleach to 10 parts water in a spray bottle.
  • Spray the solution to the areas that have mold.
  • Wait for 10-15 minutes and then brush off with a brush.
  • Rinse with plenty of water.

Warning: Wear gloves and protective eyewear and avoid spraying bleach near plants.

5. Mold Removers Or Paver Cleaning Solutions

Mold Removers Or Paver Cleaning Solutions

Store-bought mold and mildew cleaners are available for effortless removal. These contain powerful chemicals that kill and destroy tough stains on pavers, making them look pretty again. In some cases, especially around areas like swimming pools where moisture creates ideal breeding conditions for mold, the growth can be more widespread. For those specific zones, cleaning pavers around pools regularly helps eliminate the mold.

How to use it?

  • Apply according to the product’s instructions.
  • Scrub and then rinse as specified.

Tip: opt for environment-friendly alternatives to prevent harmful runoff.

How To Stop Mold From Growing on Pavers

You found out why mold is growing and found ways to remove mold on pavers. But you realize doing this every so often gets quite exhausting, not to mention how time-consuming it is. What you need now is a permanent solution that can stop mold growth and get rid of mold on your pavers. Here are some easy and effective strategies to keep your pavers mold-free:

1. Use Mold-Resistant Paver Materials

Save yourself from future hassle by staying ahead of your game and using mold-resistant materials when you clean and renovate pavers. (Plus, cutting pavers in a way that leaves no space for dirt and debris also helps a lot.) Some non-porous materials in the market are more resistant to mold growth, such as concrete, natural stone, or certain ceramics – now that would be a long-term solution right from the start! Brick stepping stones are good aesthetically and strength-wise, as it is relatively easier to clean mold off bricks.

If you have already installed your pavers, you can look for a mold-resistant treatment, which can also be coated after its installment and improve the resistance on porous pavers.

2. Regular Maintenance and Inspection

Fix the problem in its premature form rather than waiting for it to get worse. Early detection and maintenance saves you time by preventing mold problems from escalating beyond your control. The routine inspection to deal with the damages right away is the key.

A schedule for deep cleaning and removing the hidden mold inside the pavers should be considered to keep them at their best.

3. Install Proper Ventilation Structures

Another simple way to prevent the formation of molds on your pavers is to avoid moisture buildup. This can be achieved by installing structures such as Pergolas or lattice-style designs that allow airflow with controlled sun exposure. That way, the moisture buildup on the pavers will be minimized.

Conclusion

Removal of mold from pavers is necessary for maintaining the aesthetic appeal and safety of your outdoor spaces. It is only possible to manage such a situation by keeping up with the maintenance and preventing mold beforehand.

When I was first cutting pavers for my patio (using these designs), I had no idea how tricky it would get. You think you can just line them up and call it a day, right? Nope. At some point, you’re going to have gaps in the pavers where mold can grow as well over time. Then you will need to clean them after every few months. So, it is better to cut the pavers perfectly in the first go. Depending on what tools you have (or don’t have), the whole thing can either feel like a breeze or a major headache.

Honestly, the tool you use depends on your situation. Like, if you’ve got a circular saw or an angle grinder lying around, you’re in good shape already. Just grab a diamond blade that’s meant for cutting masonry, and you’re set. If you don’t have those tools and you’re dealing with a ton of pavers, renting a wet saw might save you a lot of effort. But if you’re like me and want to try the old-school way, you can’t go wrong with a hammer and chisel. It’s slow but super satisfying.

Before I Start Anything

There’s one lesson I learned the hard way: preparation is EVERYTHING. Cutting pavers without planning is a disaster. Trust me. The first thing I do is measure the space where the pavers will go. This step might seem boring, but getting those measurements right saves so much frustration later. I always calculate how many full pavers I’ll need and how many pieces I’ll have to cut. Don’t forget to add a few extras for mistakes—or accidents.

Once I’ve laid the pavers on the ground, I start looking at the empty spaces where they don’t fit. And here’s the thing—if you leave even a bit of room, moisture creeps in, especially near wet zones like pool areas. That’s exactly where mold loves to breed. If that sounds familiar, cleaning pavers around pools helps you achieve a mildew-free zone.

When it’s time to mark the pavers for cutting, I grab a pencil or chalk and use a ruler to make straight lines. Here’s a little tip I swear by: mark both the top and bottom of the paver. That way, if you’re flipping it or cutting from different angles, you’ve always got a reference point. Oh, and when I use a hammer and chisel, I mark all the sides—top, bottom, and both edges.

My Safety Checklist

Safety is non-negotiable for me. I’m not trying to get injured over some patio project. I always wear goggles. Even with small jobs, little chunks of concrete can fly right into your face, and let me tell you, it hurts. I also throw on a dust mask, especially if I’m using a saw or grinder, because that fine dust gets everywhere. And don’t forget ear protection—those tools are loud.

Tools I Usually Use

Here’s the gear I’ve relied on over the years:

  • Hammer and chisel (great for a few cuts but slow).
  • Circular saw with a diamond blade (a game-changer for precision).
  • Angle grinder (similar to the saw but smaller).
  • Wet saw (if I’m feeling fancy or cutting a lot).
  • A chalk marker, clamps, and sometimes a non-slip mat to hold the paver in place.

How to Cut Pavers With a Circular Saw or Angular Grinder?

Circular saws (7 1/2-inch blade) or angular grinders (4 1/2-inch blade) are my go-to for straight, clean cuts. They’re fast, though they kick up a storm of dust, so I always prep for that.

Marking the Line: First, I clean the paver and mark the cut line on the paver’s top side with a pencil. I use a straightedge or a square to keep the line even. Then, I transfer the line to the bottom, just in case I need to flip the paver later.

Setting Up the Blade: I adjust the saw blade so it cuts shallow at first—about 1/8 of an inch deep. Starting shallow helps me control the cut better.

Making the Cut: When I start cutting, I go slow. I make multiple passes, each time cutting a little deeper. I don’t try to slice through the whole thing in one go—it’s way easier this way.

Flipping the Paver: After cutting halfway through, I flip the paver and repeat the process on the other side. This helps avoid any jagged edges or breakage.

Breaking It Off: Once the grooves are deep enough, I set the paver on a flat surface and give the waste part a gentle tap with my hammer. It usually breaks cleanly along the cut line.

The satisfaction of a perfectly cut paver is immense, and you can achieve a similar level of visual appeal when you learn the best ways to get a green lawn.

Wet Saws Are My Favorite for Big Projects

When I had to cut a bunch of pavers for my driveway, I rented a wet saw. Best decision ever. It’s basically a larger version of those tile saws, and it sprays water while cutting, which keeps the dust down and the blade cool.

Here’s what I did:

  • I marked the paver like I usually do.
  • Placed it firmly on the saw sled, lining up the blade with my mark.
  • Turned on the saw and let the water flow over the blade.
  • Slowly pushed the sled forward, keeping my hands far from the blade.
  • Once the cut was done, I slid the sled back, removed the paver, and admired my work.

How to Cut Pavers Without a Saw – My Hammer-and-Chisel Method

There’s something satisfying about breaking pavers with a hammer and chisel. Sure, it’s not as fast as a saw, but for a handful of cuts, it’s perfect.

  • First, I mark all four sides of the paver.
  • I lightly tap the chisel along the line to create a shallow groove. It’s important to go slow here—if you hit too hard, the paver can break in the wrong spot.
  • Once I’ve scored the line, I set the paver on a flat surface and give the chisel one good, firm strike in the groove. Nine times out of ten, it breaks cleanly.

How to Cut Brick Pavers With Brick Splitters?

Sometimes called guillotines, these manual tools are perfect for brick and concrete pavers. They’re quiet and dust-free.

Step 1: Align

I place the paver on the splitter. Line up the cutting edge with your mark.

Step 2: The Split

I pull the handle down sharply. Done. Easy, right?

Drilling Holes in Pavers

I don’t do this often, but sometimes I need to drill a hole—for posts or drainage. Here’s how I go about it:

  • I always use a rotary hammer for newer concrete or a hammer drill for older stuff.
  • I mark the spot where I need the hole, then place the paver on a flat surface.
  • With the drill set to high speed, I drill straight down, keeping the bit as vertical as possible. Drilling at an angle can cause cracks, and no one wants that.

If the hole needs to be bigger, I switch to a larger drill bit and go again. It takes patience, but the result is worth it.

Some Lessons I’ve Learned

  • Always order extra pavers. You think you won’t mess up, but you will.
  • A wet saw saves so much time if you’re doing a big project.
  • Cutting outside on a windy day? Smart. The wind takes care of the dust.

So, that’s how I cut pavers. It’s not rocket science, but it does take patience and a little know-how. No matter which method I use, I try to enjoy the process—it’s all part of building something cool!

FAQs

What are the best tool for cutting pavers?

Circular saws or grinders for quick cuts. Wet saws for precision.

Can I avoid using a wet saw?

Sure, but it’s messier and more time-consuming.

What blade is best?

Always use a diamond blade. It’s made for masonry and stone.

Your bathroom sink goes through massive use daily. Therefore, it is super easy for dirt particles, hair, soap residue, and other debris to build up on the sink surface and clog the sink drain. Not only does it make your sink look unappealing, but it also increases the chances of germs spreading infections. Thus, the most reliable method for maintaining your hygiene is a complete top-to-bottom cleaning of the bathroom sink.

In this guide, we’ll have a detailed look at the essentials and steps for cleaning a bathroom sink.

How To Clean Bathroom Sink?

Before cleaning your bathroom sink, you must thoroughly understand what to use to clean bathroom sink and the cleaning procedure. So to make you understand, below are mentioned the details about the essentials and the procedure for sink cleansing.

Essential Tools and Supplies

essential for Sink cleaning products

The supplies you need to clean the bathroom sink differ from those you use when you clean your bathroom floor and roof. The essentials for sink cleaning include:

  • Gloves
  • Microfiber cloth
  • Sponge or scrub brush
  • Bent wire hanger
  • Cleaning detergent (store-bought or homemade)
  • Baking soda and vinegar (optional)

Step By Step Cleaning Process

All bathroom sink cleaning steps you need to follow during a thorough house cleaning are explained below.

1. Wipe Down Your Sink

At the first step, remove the dirt, hair, and any other debris from the sink surface without wetting it. Then, dampen any sponge or cloth with tap water. Clean every part of the sink with it, paying special attention to the faucet and drain.

2. Rinse Your Sink

After wiping down, splash water over the sink to remove any remaining dirt particles. Try to use hot water so that dirt buildup can be easily loosened and cleaned. Rinse all sides of the sink, including the outer and inner parts and areas around the faucet and drain.

3. Spray The Detergent

Select the bathroom detergent depending on the material of your sink. Here’s the type of detergent that can suit you perfectly, depending on your sink material.

Sink MaterialDetergent Type
Ceramic SinkA liquid abrasive or non-abrasive detergent, or an all-purpose detergent.
Porcelain SinkA liquid abrasive or non-abrasive detergent, or an all-purpose detergent.
Metal or Stainless Steel SinkStainless steel detergent or an all-purpose detergent. Avoid abrasive detergent.
Glass SinkA glass or general sink detergent, an all-purpose detergent, or a non-abrasive detergent.

After selecting the suitable detergent, spray it on the entire surface of the sink, also around the faucet, and the drain. Wait for a few minutes so that the detergent settles down and performs its cleaning action efficiently.

4. Rinse Off The Detergent

Using a sponge or cloth that’s slightly wet, make sure no part of the sink’s top goes uncleaned. Apply pressure if you find some dirt buildup or stain there. Avoid using abrasive materials such as a metal scourer, as these materials can result in the loss of surface coating.

5. Sprinkle Baking Soda

If you notice your sink is still dirty, nothing to worry about. The removal of stubborn stains from the sink surface is much easier than removing the stains from the walls. Just take baking soda and sprinkle it on the dry sink surface.

Next, just scrub the sink with your damp cloth. You’ll see the baking soda become a paste. Keep swirling the damp cloth in circles until no stain is left there. Then, rinse the sink with water and dry it. The strong cleaning properties of the baking soda will help remove the stain efficiently.

6. Clean The Sink Drain

You should clean or unclog your sink drain at least once, particularly when deep cleaning your bathroom. Bent wires can be used to remove clogging material, such as soap residues and hair. When it comes to the best way to clean bathroom sink drains, using a solution of baking soda, vinegar, and boiling water to flush them out is recommended.

For this purpose, pour the boiling water into the drain. Now, add one cup of baking soda and then vinegar to the drain. Place a cover over the drain and allow it to react for about 5 to 10 minutes. At the end, again use boiling water to remove any remaining clogged material.

7. Disinfect the Sink Surface

If the sink detergent you used earlier doesn’t contain disinfecting properties, bleach can be a suitable option to disinfect the surfaces. The next step is to prepare the cleaning solution. Add 3ml of bleach per gallon of water and then fill the tank with it. Let it work for around 5 to 6 minutes before draining. Next, wipe all sink surfaces and allow them to air dry completely.

8. Keep The Sink Clean

Rinse the sink after every use. Whenever you wash your hands, remove your makeup, or brush your teeth, pour the water on the entire sink. It will prevent the building of debris or dirt particles and keep your sink clean for a longer period. Moreover, try to disinfect the sink daily to keep it germ-free.

Pro Tips For Cleaning Bathroom Sink

Keep these pro tips in mind to get the efficient cleansing of your bathroom sink.

  • When rinsing the bleach, ensure that no residue of bleach is left behind on the sink surface.
  • Use bleach only on white porcelain sinks. On colored sinks, bleach will damage the color Coating.
  • Don’t mix the bleach with the acidic detergent or any other acidic cleaning solutions.
  • Avoid using bleach that contains sodium hypochlorite in a metal sink to prevent corrosion of the metal surface.
  • Whenever applying the detergent or disinfectant, wait until the solution settles properly to ensure the complete killing of bacteria.
  • Try to buy a detergent that also contains disinfecting properties, so that you can avoid the separate step of disinfecting the sink surface.

Conclusion

Cleaning bathroom sink is a super-easy and quick procedure. Within just 15 to 20 minutes, you can thoroughly clean and disinfect the bathroom sink. All you have to do is select the specific detergent depending on the sink material. Spray, scrub, and rinse the sink surface for a clean finish. If required, unclog the sink drain. Furthermore, develop the habit of rinsing the bathroom sink after every use.

Also Read: The Complete Deep Cleaning Checklist for a Spotless Home

Do you want a dedicated workspace for home-based work but you don’t have a spare room? You don’t need to worry at all. What if your office is incorporated into your bedroom in a certain way that it completely blends with the rest of the room? Yeah! you heard it right, office bedroom ideas sound cool, right?

The concept of a conjoined Bedroom office has gained popularity in the past few years after the pandemic. Nowadays, most people want to work from home and even if they don’t, they prefer a workspace to do the residual office work and other stuff that needs focus.

Bedroom Office Ideas to Maximize Productivity and Boost Focus

The major goal while designing a bedroom office is to improve productivity without compensating for style and comfort with a minimum expenditure. We have composed several smart, unique, and budget-friendly bedroom office and wall decor ideas. Get ready to design your dream bedroom office and balance your work life.

1. Choose The Glazed Window

Choose The Glazed Window

This bedroom office design is a wonderful approach related to lighting, decor, and furniture. The office is positioned in front of a glazed or textured wall with dark floor-to-ceiling creating a spacious feel. A solid desk, a simple wooden chair, and a central storage cabinet are all you need for your office. The wooden floor, chandelier, and greenery further complement the look.

2. Build-in Office Setup Beside The Door

Build-in Office Setup Beside The Door

This well-organized and aesthetically pleasing design positions the office against the entry clean white or any solid color wall. A fixed desk alongside drawers on one side and a vertical shelved cabinet for decor on the other section would be more appealing for the sight. A revolving chair can be pushed into under space after you are done with work. If you are looking for a budget-friendly and simple but elegant bedroom office, go for it.

3. Install an Office Wall

office room wall

This bedroom office Interior design is a great choice for long-term home-based workers. A dedicated workspace wall, either board and batten or any other theme, is created opposite or beside the bed. A built-in or fancy desk is aided by shelves and a side closet for storing documents and hiding clutter. The white and black contrast creates a disciplined look. Be sure to clean your bedroom office, and living room, or deep clean other places at the end of the day to allow yourself to forget about work. Take a look at this bedroom cleaning checklist to help with this task.

Read more on Cleaning: How to Clean Your House from Top to Bottom

4. Tuck the Desk Into the Corner

Desk into the corner

The corners of the rooms are usually overlooked but can be turned into beautiful office setups. This design is a perfect blend of simplicity and elegance. It is positioned in the room corner along the side table with its back towards your bed. The sleek desk along with a comfortable chair provides you maximum comfort. It can also be used as a book shelve. This one is a great bedroom idea for a teen who juggles study, work, and a job, and it can also inspire ideas for creating a soothing atmosphere in a gray-themed bedroom.

5. Incorporate a Murphy Bed

If you find your bed as a distraction during working hours, what about hiding it? The idea of placing a Murphy bed in a floor-to-ceiling cabinet. The bedroom office is nestled beside the bed with ample storage and shelves. The color choice and position of the window is just wow.

6. Create a Separate Zone (Common Bedroom Office Ideas)

Common Bedroom Office

This arched workspace is recommended For creating a separate work zone. A built-in desk is installed right in the window or the resting bed. The window is provided with blinders if you want to restrict light. The wooden shade introduces a soft look while maintaining the uniqueness of the design.

7. Move The Desk Into The Closet

closet office room

What if I tell you you can turn your closet into a beautiful workspace like this design? Place your desk in the space along with a revolving chair. Clean the walls of the closet and decor with beautiful wallpaper and don’t forget to install some shelves. This is one of the easy-to-go teen bedroom ideas for office setup as they like decor but can’t invest much.

8. Set up The Alcove (The Creative Bedroom Office Ideas)

alcove bedroom

Consider this amazing design if you require a hybrid office bedroom idea for couples. It utilizes the alcove to create a focused workspace. The comfortable chairs facing opposite the desk are introduced for relaxing and gossiping with your partner during a break. This elegantly designs the spacious bedroom while maintaining separate zones for working, lounging, and sleeping.

9. Position The Desk into a Nook

bedroom nook workspace

This bedroom office setup is designed to depict a traditional but trendy idea. A unique and shiny wooden desk with built-in shelves is positioned in a nook with a less consuming space in the bedroom. This is one of the best small-bedroom office combo ideas to consider. If you don’t want to skimp on style, check our bedroom wood wall ideas and how to clean them to add some decor.

10. Install A Secretary Desk Setup

Install A Secretary Desk Setup

If you are looking for ideas for a small bedroom office, consider a Murphy desk. A foldable desk along with shelves and storage is fixed beside a window. You can unfold it when it’s time to work and fold it back when you clock out. It is a smart idea to conceal the clutter and store the documents as well.

Conclusion: Best Bedroom Office Ideas Tips for Creating Dream Workspace

While designing a bedroom office the focus is on the right layout, furniture, storage, lighting and window treatments, and budget-friendly decor.

Here are some tips to make it a great experience for you;

  • Keep your desk separate from the bed to the extent possible.
  • Position your desk in a way that it faces away from the bed.
  • Consider a secretary or foldable wall desk that can be folded after work.
  • Try to keep your workspace as organized as possible.
  • Position your desk in a direction that allows the maximum reach of sunlight.
  • Use soft colors and hues in the decor as they give a sense of calmness and peace.

Related Content: White Living Room Ideas

If you’re looking to jazz up your outdoor space with a walkway, patio, or even a small garden area, cutting and laying pavers is the ultimate way to get that sleek and functional finish. You’re going to make your outdoor area look like something straight out of a magazine. Not nearly as hard as it sounds – kind of fun once you get into it, but you will want some material, preparation, and a little patience. So let’s get into the nitty-gritty of laying pavers like the pro you were born to be!

8 Steps to Install Pavers for your Outdoor Space

Gather Your Tools

Before you start digging into your yard like an over-excited dog, make sure you have the right tools:

  • Pavers (brick, concrete, or stone-your choice)
  • Base of sand or gravel (foundations=everything)
  • Landscape fabric
  • Edging materials
  • A rubber mallet
  • Level-because sloppy pavers ain’t cute
  • Tamper or plate compactor
  • Measuring tape and stakes

Check the list twice, now. Awesome. Let it roll

Planning is Key

Determine your design and pattern of pavers. If you have a patio or a walkway, planning ahead is key. Mark the area where the pavers will be laid using thread and stakes. Measure twice, to avoid having to redo it later, of course!

Add a Gravel Base

Time to get in touch with your inner archaeologist. Dig out the area where your pavers will go, about 6-8 inches deep. This makes room for the base materials and means your pavers won’t just sink into the ground like a sad, forgotten ship.

Pro tip: If you’re Googling how to lay pavers on dirt right now, I’ve got news for you. You can slap them down on dirt but they’re just not going to last. Trust me when I tell you it is worth it to add a gravel and sand base.

Lay Down Sand Over the Base

First, lay down landscape fabric to block weeds (because nobody wants to fight dandelions later). Then add 4-6 inches of gravel and compact it with a tamper. On top of that, spread about an inch of sand. Smooth it out like icing on a cake—this is where your pavers will sit pretty. That’s how you lay sand correctly!

Start Putting Pavers on the Sand Base

Starting to put your pavers in the desired pattern is the exciting phase. You can do a traditional grid or get crazy wild and design a herringbone. You can cut the pavers in your desired design first and then lay them flat on the sand base. Tap each one into place with your rubber mallet and level them as you check them. Stepping on a loose paver isn’t fun.

Edge It Up

Edging is like the eyeliner of your paver project—it keeps everything sharp and in place. Use plastic, metal, or concrete edging to frame your masterpiece and stop your pavers from sliding around.

Fill the Gaps

Time to lock those pavers in! Sand should be spread out and swept into the joints. Polymeric sand is a solid choice because it hardens when wet, giving your pavers extra stability.

Tamp and Enjoy Your Handiwork

Grab that tamper once again, and tamp those pavers into the base. Now it all should be snugged in there and level. Sweep off any remaining sand, step back, and bask in the glory of your hard work. You did it!

Now that your paver project is looking fantastic, consider how to cultivate a lush green lawn to complement your new outdoor space.

Quick PSA: Mold Happens, But You’ve Got This

Outdoor pavers = mold magnet, especially in shady or splash-heavy spots like around pools. If you’re dealing with that, cleaning poolside pavers is a practical solution that actually works. If you ever spot that greenish-black mold creeping in the pavers don’t panic. Sweep the area clean, then scrub it with a vinegar solution (or a mild bleach mix if things are really bad) to clean your pavers. Prevention is key, so stay on top of regular cleanings!

Tips for Different Paver Styles

Tips to Lay Different Paver Styles

How to Lay Brick Pavers

Brick pavers scream classy but need precision. Use spacers as necessary, but keep those lines straight. Uneven spacing may be quite annoying.

How to Lay Concrete Pavers

These guys are totally rugged and great for patios or driveways. Make sure your base is solid rock to put up with the abuse.

How to Lay Patio Pavers

Patios are all about the big picture. Check your levels obsessively as you go so you don’t end up with a tilted patio that doubles as a water slide when it rains.

Budget-Friendly Paver Hacks

Want to save some cash? Mix and match paver styles, use recycled materials or opt for smaller areas. For more inspo, you can also follow some patio paver ideas online.

Final Thoughts: You Nailed It

Learning how to lay pavers isn’t rocket science, but it does take some planning and effort. The result? A stunning outdoor space you’ll want to show off to literally everyone. Now, go grab a cold drink, sit on your freshly laid patio, and soak up the satisfaction of a job well done. Oh, and don’t forget to snap a pic for the ‘gram—you’ve earned it!

A tidy kitchen is more than simply appearances. It is also necessary for hygiene, food safety and maintaining a healthy and well-cleaned home. Everything we eat affects our overall health. In order to eat healthy, it is mandatory to regularly cleaning the kitchen space for the prevention of food deterioration and maintenance of health.

Kitchen Cleaning Checklist | Step by Step Guide

1. Organizing and Managing Surfaces

You can begin by organizing goods, crockery and every other thing from your cabinets, drawers, shelves and countertops. It will not only eliminate the expired products and those utensils which are of no use anymore, but it will also create more room in order to accommodate stuff. With empty surfaces, you will have space to clean thoroughly without any obstacles.

Sorting Items into Categories:

You can opt for sorting items into these categories:

  • Keep
  • Donate
  • Trash

It clears the area and also sets the stage for reorganizing items later. Furthermore, you might rediscover some forgotten treasures hiding in the back of your shelves!

2. Wiping the Dust off the Cabinets, Drawers, and Other Surfaces

The equipment’s you need for the cleaning of the kitchen space are mentioned below which is the next measure to clean the area

  • Scrub brush
  • All-purpose cleaner
  • Microfiber cloths
  • Bathroom cleaner
  • Degrease
  • Furniture Polish
  • Sanitize
  • Descale
  • Deodorize
  • Dish soap
  • Plastic gloves

Mixture of dish washing soap and lukewarm water can be used for the purpose of cleaning kitchenette spots. Wipe down the surface of your cabinets and drawers, making sure to remove crumbs, grease, dirt or dust that may have accumulated there over the period of time. Fire smoke destroys the paint of the wall, leaves behind the stubborn residue along with lingering odors.

In addition to this, you can also use a brush to brandish over the whole surface. The very next procedure is to do an immaculation of your countertops and backsplash. Use a soft brush or toothbrush to get into the tricky spots such as the gaps between the tiles. If your backsplash is particularly oily, nasty and greasy, a degreaser can make the job convenient.

Make certain to wipe down the handles and knobs of your cabinets and drawers too, as these regions are more prone to accumulate dirt and grime.

Pro Tip:

Use liquid cleaners while wearing plastic gloves to protect your hands.

3: Deep Cleaning of Electrical Appliances:

Giving your electrical devices a thorough clean is essential.

In case of Refrigerator:

Commence with your refrigerator. Take out all the food, unclutter the cabinetry, cupboards, shelves and clean walls, and check for expired things. In case you find mouldy or rotten stuff, toss that in the garbage can and reorganize everything neatly when you’re done cleaning.

In case of Microwave or Oven:

Attempt to clean your microwave or oven, tackling both the inner as well as the outer surface. If you have stubborn grease, marks or baked-on messes, perform scrubbing by applying cleaner prior to it.

Other Appliances:

Do not forget smaller appliances like your toaster, coffee maker, or blender. A quick wipe-down and a thorough cleaning of removable parts will keep them looking and working their best. You are supposed to remove the dirt from the switches and buttons as well.

4: Managing the Sink and Drain Baskets In case of Kitchen Floor

Clean the sink of the kitchenette by scrubbing the basin, faucet, and handles with a gentle abrasive cleaner or baking soda paste in order to get rid of the scrap. Do not forget to clean the drain and any sink accessories, such as a drying rack or garbage disposal. Make sure to dispose of the garbage after the cleaning and also rinse the drain baskets deeply. As all other parts of the house need to be cleaned comprehensively, the cooking area also demands to be kept as hygienic as possible. It is mandatory for the upkeep of the health.

In case of Kitchen Floor

Ultimately, deep cleaning of your kitchen floor. Start by sweeping or vacuuming to pick up crumbs, dust and dirt. Mop with a cleaner and get it into all of the nooks and corners of the kitchen. For those who prefer non-toxic home care, using a natural stain remover for wood floors can be just as effective as chemical cleaners for removing stubborn spills without leaving a sticky residue.

5: Reorganization and Addition of Final Touches

After the cleaning of the pantry, arrange items in your cabinets and drawers, using organizers, tags or labels to keep the things organized and within the range. Organize similar products in the same drawer like baking supplies, cooking utensils, vessels and snacks, all items of the same type in each compartment for easier access.

Bonus Tips:

Pay attention to the other details like cleaning your light fixtures, vents, and any other decorative item such as vintage cooking-related items to make your kitchen more fresh and inviting. Beyond lighting, you can truly transform the heart of your home by exploring creative corner seating designs that turn a simple cooking area into a multifunctional family space.

Why Deep Cleaning Matters:

Maintaining a neat kitchen saves you time and work in the long term. It also helps you to lead a healthier, hygienic and longer life!

Conclusion:

Our scullery also needs to receive the same amount of care and attention regardless of the season. During all kinds of weather whether winter or summer, our kitchenette serves us. It is our duty to duly manage its cleanliness. Happy cleaning!

Cleaning concrete patio pavers can be tough because they receive a lot of foot traffic. Dirt, grime, molds, and algae build up in the corners and gaps of the pavers, making them tricky to clean.

But with the right tools and techniques, you can clean your patio paver in no time. In this piece, we have collected some useful patio cleaning ways suggested by home improvement experts.

Let’s get straight into it!

8 Best Ways to Clean Concrete and Patio Brick Pavers

These are the top most effective ways to clean and redo pavers. You can pick 2-3 different methods, depending on how unclean your patio is.

1) Basics First: Blowing, Sweeping, Wiping, And Soap Water Solution

This one is a no-brainer but worth mentioning because many people skip the basic step and directly jump to picking the expensive tools and cleaners.

Cleaning starts with simple sweeping. If you have loose dirt, debris, grime, dried leaves, or trash thrown on the patio, pick up the broom or leaf blower to clean it. Then, for stains, make simple soap water and scrub the concrete surface. This is also the best way to clean outdoor pavers around the pool.

2) Use Vinegar Or Bleach For More Tough Stains

Vinegar is another most popular option to clean even the hard-to-reach corners of the patio when soap water does not work. Tompkins County Health Department also recommends using white distilled vinegar for general patio cleaning purposes.

Here are the brief steps:

  • Combine equal parts of white vinegar and water.
  • Spray directly onto the affected areas.
  • Scrub the surface and rinse.

However, when using bleach, dilute it first, as it can be harmful to the skin.

3) Do Baking Soda Scrub

Another tip is to use baking soda to clean the pavers from mold and stains. Mix baking soda in water to make a smooth paste. Apply it on the spot and use a soft brush to scrub it. After just around 15 minutes, wash it away with water.

4) Pressure Washer

Many people use the pressure cleaning technique because it is less hectic and extremely gratifying. Just use the right nozzle size and maintain a safe distance. Experts suggest dampening the pavers with soapy water to enhance their cleaning effects.

Ashton Staudacher, a DIY home improvement influencer, cleaned her patio stones with a pressure washing technique. Since she does not prefer chemical cleaning methods, she finds power wash paving stones much more satisfying and easy.

5) Using Paver Cleaning Products

There is a constant debate between people who use power washers and the ones who prefer the best paver cleaners that are chemical-based. Realistically speaking, both ways have their own pros and cons.

If you want to clean pavers without damaging their structure, chemical cleaning is the best. These cleaners will surely remove the algae and moss build-up but might not be effective in cleaning them fully.

A DIY expert used 3 different types of cleaners and pressure wash to clean the pavers and pressure washer to see what options were the best. He concluded that the green tinge of moss was cleaned, but the slabs were not as bright as he expected. So, he had to use the pressure washer later on to clean them fully.

6) Electric Patio Cleaner

Electric patio cleaners are used to deep clean the pavers completely. They are eco-friendly, make less noise, and are extremely easy to use.

  • Set up the cleaning equipment and connect every part carefully.
  • Clear the area and spot the stains.
  • Gently sweep the surface of the patio.

Expert Note: Always let the surface air dry before walking on it to avoid any possible hazards.

7) Use Hydrogen Peroxide

If you do not like to use bleach, hydrogen peroxide is a much safer option. However, ensure that the solution you are making has just 3% concentrated hydrogen peroxide. Apply it on the surface and scrub it after a few minutes. Then rinse and let it dry. You might have to repeat the process if you see no difference.

You can see this in action in a case study where hydrogen peroxide is used to remove the stains of rusty metal chiminea from the patio pavers.

8) Use Sealant At The End

According to the Concrete Masonry & Hardscapes Association, it is extremely important to use sealers to protect the pavement from dirt and grime. From day-to-day spills to strong weather conditions, these sealers help prevent your patio from getting damaged again. Because let’s be honest, you won’t like to do the hard work again after a few weeks of cleaning it from top to bottom. For long-lasting results, ensure that your pavers are installed correctly in the first place. This will ease your cleaning efforts.

Just as proper paver installation makes cleaning easier, understanding how to cultivate a beautiful green lawn ensures your entire outdoor area remains pristine with less ongoing effort.

Finally, How Do You Clean Concrete Pavers?

Next time planning your winter cleaning project of your patio, you should keep in mind the following points:

  • Use less harsh compounds first. For example, soap water, dilute bleach, or vinegar.
  • Sweep loose dirt and grime.
  • Use a pressure washer and other electric patio cleaning tools to deep clean the tough stains.