")
Practical outdoor reading nook ideas and concepts go much deeper than just providing a place to rest one’s rear in the fresh air. Such setups do generally consist of a combination of comfy, weather-proof seating, an area for shade, and sufficient privacy for deep relaxation.
It doesn’t matter if you have a tiny balcony in your flat or a huge patio. Having your cozy nook to relax with some reading is all that you need. Carefully selecting the layout and materials reflecting the climate, location, and your space is the secret.
This article talks about 15 outdoor reading nook ideas, including how to set up, prices, and weatherproof ways, so that you can use the area all year long.
How to Create the Perfect Outdoor Reading Nook
Choose the Best Location for Your Outdoor Reading Nook
Landscape architect Andrea Besten recommends selecting a place for the reading nook that will be exposed to the sun before noon and covered during the heat of the afternoon. In this way, the spot won’t overheat at midday.
To keep the reading nook private, ideally, it should be 15–20 feet away from the neighbors’ line of sight. Light is usually the most challenging aspect of the project; a 2024 Houzz survey revealed that 67% of people have difficulties with it, so choosing the right spot is essential.
Look for level, firm ground (decks, patios, or paved sections with stepping stones). For natural privacy, put them 3–5 feet away from walls and fences, then add screens or plants. Make sure there are 36 inches of space around the chairs for convenient mobility. Choose furniture accordingly — light furniture for compact areas with cheap patio pavers, loungers, and hanging swings for bigger patios.
Best Outdoor Furniture Materials for Reading Nooks
Sarah Michaelson from Michaelson Interiors suggests using HDPE wicker or powder-coated aluminum because these materials are fade-resistant and dry quickly. She also recommends choosing fast-drying foam with removable, UV-resistant covers while avoiding any pillows that tend to hold water.
| Material | Durability | Price Range | Best Brand/Model |
|---|---|---|---|
| HDPE Wicker | 10–15 Years | $300–$800 | Leisure Touch synthetic rattan |
| Teak Wood | 20+ Years | $500–$1,200 | Polywood Classic Adirondack ($339) |
| Powder-Coated Aluminum | 15+ Years | $400–$900 | Frontgate Rowan Adirondack ($700) |
| Recycled Poly Lumber | 15–20 Years | $350–$750 | Polywood Modern Curveback |
How to Weatherproof an Outdoor Reading Space
Outdoor design specialist Jamie Gold says that not enough rain protection accounts for 78% of outdoor nook failures. Buy covers before you buy furniture.
- Shade Options: To block the sun from 10 AM to 4 PM, put up a shade sail ($40–$120) or a pergola ($1,500–$5,000).
- Furniture Covers: Ruimoy Patio Furniture Covers ($30–$46) or Duck Covers Ultimate Waterproof Chair Cover ($25–$43).
- Outdoor Fabrics: Get cushions composed of Solution-Dyed Acrylic — fade-resistant and simple to clean.
- Waterproof Storage: Store books in weatherproof containers ($50–$150) when not in use.
Best Outdoor Reading Nook Lighting Ideas
For concentrated illumination free of glare, specialists advise putting solar lanterns two to three feet from your chair. According to the 2024 Houzz survey, 67% of builders found lighting to be the most difficult problem.
| Type | Price | Best For | Brand Recommendation |
|---|---|---|---|
| Warm white LED string lights | $25–$60 | Ambient ambiance | Govee Perimeter ($59) |
| Solar lanterns | $15–$45 | Focused page lighting | Mr. Beams MB360 ($18) |
| Battery-operated LED lamp | $30–$70 | Task lighting | BioLite Camp Lux ($65) |
Privacy Advice
- Privacy Screens: Jute panels ($35–$80) or bamboo panels ($40–$120 for 6ft).
- Vertical Gardens: Potted plants and tall shrubs ($25–$150 each) establish natural barriers.
- Railing Planters: For balconies, use bamboo blinds ($30–$70).
- Curtain Enclosures: Lightweight weather-resistant curtains ($50–$150) on basic frames.
How to Make an Outdoor Reading Nook More Cozy
- Outdoor Rugs: Create space and shield from heat ($40–$180 for 5’×8′).
- Weatherproof Cushions: Quick-drying foam with UV-resistant covers ($30–$80 each).
- Throw Blankets: Cotton or synthetic mixes for cooler evenings ($25–$60).
- Side Tables: Metal, treated wood, or durable plastic ($35–$120).
15 Outdoor Reading Nook Designs for Every Space
1. Moon Garden Pergola Retreat
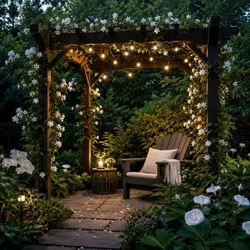
- Best Location: Detached Homes with Private Backyards
- Setup: Pergola frame, jasmine + moonflower planting, Sunbrella weatherproof cushions, string lights, Polywood Adirondack chair
An architecturally designed pergola provides the framework, but does not need a complete pavilion, creating a relaxing atmosphere even in small houses. The Night Garden installation has been used in past seasonal landscapes at Filoli and shows similar design themes. Furthermore, according to Andrea Besten of Besten Garden Design, a National Association of Realtors report shows a pergola increases your property value by approximately 4% to 7%.
Pro Tip: Install east-west pergola orientation to maximize evening shade consistency and fragrance drift.
2. Glass-Enclosed Greenhouse Nook
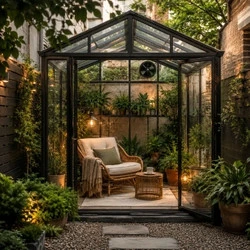
- Best Location: Urban Homes with Small Gardens/Courtyards
- Setup: Tempered glass enclosure, weatherproof cushions, indoor-safe rattan chair, ventilation fans
This nook design transforms a compact garden into a climate-buffered reading retreat that functions throughout the year. Designer Maria Chen applied this micro-climate design with plants, which were highlighted in the greenhouse trend reports by Houzz in 2024, resulting in greater amounts of usage throughout every season of the year.
Pro Tip: Use UV-filter glass (90%+ protection rating) to prevent book and textile fading.
3. Cascading Fern Grotto

- Best Location: Shaded Side Yards/North-Facing Gardens
- Setup: Vertical fern wall, stone bench, drip irrigation, moss ground cover
An outdoor reading nook with layered fern, moss, and other shade-loving plants. An example is Robert Kinley’s (Kinley Gardens – Portland) vertical greening density system using ASLA-style biophilic shading principles to achieve maximum plant density for RHS Urban Gardening studies.
Pro Tip: Layer Boston fern + maidenhair fern mix to increase humidity retention and acoustic buffering.
4. Rattan Cocoon Chair Edge
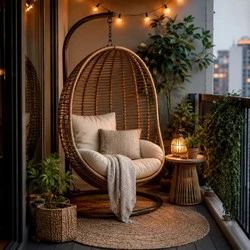
- Best Location: Balconies & Compact Patios
- Setup: Hanging egg chair or cocoon chair, outdoor rug, side table, LED string lights
Rattan furniture addresses one of the most searched outdoor reading nook ideas: creating a comfortable reading retreat within limited balcony space. Many have seen cocoon chairs used in urban outdoor styling projects on websites like IKEA, Wayfair, and Apartment Therapy. They’re designed to help utilize space effectively and create an ideal environment without overwhelming the footprint.
Pro Tip: Anchor chair to a structural beam load-tested for 250-300 kg minimum.
5. Modern Zen Corner with Stone Bench
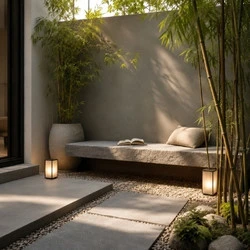
- Best Location: Minimalist Courtyards & Modern Villas
- Setup: Concrete slab, stone bench, gravel base, potted bamboo, solar lanterns
This principle of Scandinavian outdoor decor is often mentioned in Nordic Design Reports, emphasizing that low-visual-noise environments increase cognitive focus. Designers like Sarah Sherman Samuel and practitioners of Scandinavian landscaping commonly consider natural materials, muted/low palettes, and uncluttered floor plans. The objective is not decoration density but cognitive calm, making the space better suited for focused reading.
Pro Tip: Use matte-finish stone to reduce glare reflection by up to 40% in daylight.
6. Rooftop Hammock Balcony
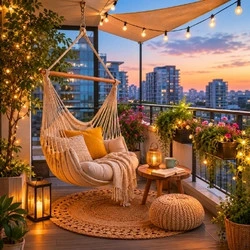
- Best Location: High-Rise Apartments
- Setup: Hammock chair (Yellow Leaf Hammocks or Vivere), weatherproof cushions, solar lanterns, compact outdoor rug, railing planter boxes, shade sail
Converts underused vertical outdoor space into a highly efficient balcony reading nook. This concept is frequently seen in urban projects highlighted specifically by Apartment Therapy, and successful renovators of roofs from New York City, including Alexandra Torres, where lightweight furniture and flexible layouts maximize usability.
Pro Tip: Use stainless steel anchor bolts rated for dynamic load movement.
7. Cottagecore Rose Trellis Corner
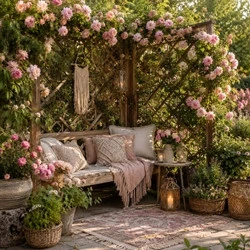
- Best Location: Suburban Gardens & Cottage Homes
- Setup: Rose trellis, wooden bench, outdoor rug, boho outdoor decor accents (macramé cushions, woven throws, vintage lanterns).
This romantic outdoor reading nook idea features seasonal interest and sensory appeal, inspired by English garden traditions and made popular by Houzz and trend reports from Gardenista. Heritage Landscapes landscape architect Emily Vance created this highly romantic botanical enclave through the use of flowering climbing plants, vintage-inspired outdoor furniture, and the use of layering in planting, resulting in one of the fastest-growing landscape aesthetics in recent years.
Pro Tip: Train climbing roses in a diagonal lattice pattern for faster canopy formation.
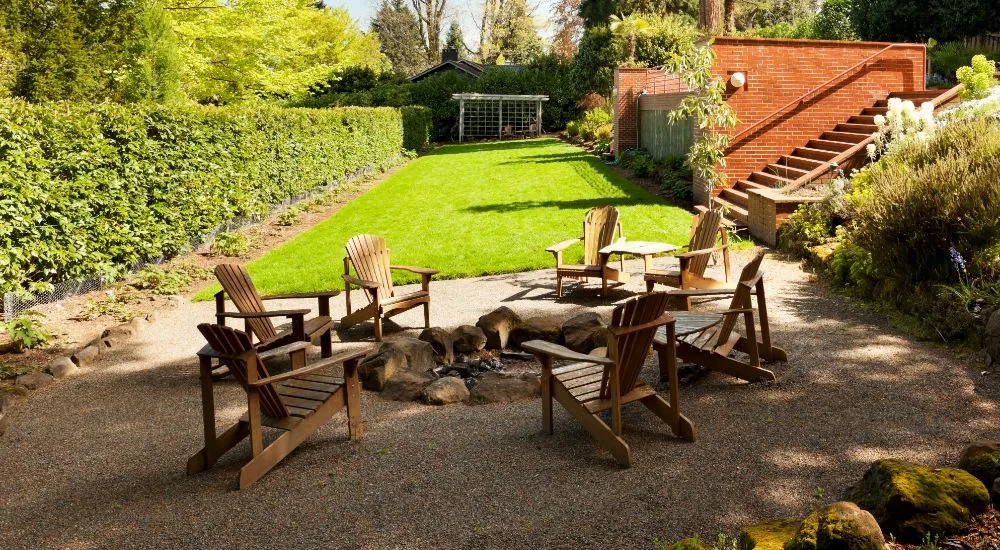
8. Fire Pit Seating Circle
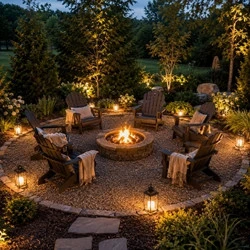
- Best Location: Large Backyards & Social Homes
- Setup: Fire pit, Adirondack chairs, gravel base, solar lantern ring
The concept is regularly documented in the National Association of Landscape Professionals’ seasonal usage reports. Studies show homeowners spend more on features that increase outdoor use; therefore, fire pits are the most sought-after feature. It provides warmth, social connection through the fire, and a visual focal point in one outdoor location. The fire itself will help to anchor the surrounding area.
Pro Tip: Maintain 36-48 inch safety clearance around the fire zone. Raise the reading chair(s) with deck tiles to avoid the heaviest smoke column area.
9. Repurposed Shed Library
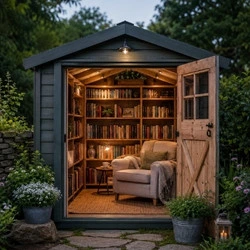
- Best Location: Rural Homes/Large Gardens
- Setup: Converted shed, bookshelves, insulation panels, reading chair
This nook transforms an ordinary storage building into a dedicated reading sanctuary. The trend rose through architecture seen in UK garden office sheds and backyard studios. Designers like George Clarke, known for showcasing creative designs of small spaces, illustrate the success of adaptive reuse. Using an existing shed decreases the construction complexities while maintaining the benefits that come with a stand-alone garden room.
Pro Tip: Add vapor barrier insulation to protect books in a 45-55% humidity range.
10. Vertical Herb Garden Nook
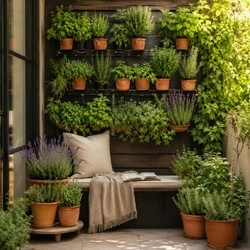
- Best Location: Small Courtyards & Kitchen Gardens
- Setup: Vertical herb wall, bench seating, drip irrigation, clay pots
The concept is strongly influenced by Royal Horticultural Society instructions on urban gardening, since vertical systems make it possible for homeowners to increase the density of plants in small areas. Herbs provide texture, fragrance, and seasonal diversity while requiring relatively little floor space. The idea is particularly suitable for patios and balconies where conventional garden beds are not feasible.
Pro Tip: Combine lavender + thyme to improve aromatherapeutic effect during reading.
11. Minimalist Concrete Platform
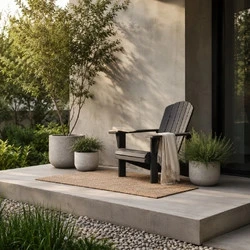
- Best Location: Modern Apartments & Villas
- Setup: Concrete platform, Adirondack chair, outdoor rug, potted plants
This design reflects contemporary work by designers such as Thomas Rainer and Scandinavian-inspired landscape studios that prioritize simplicity, usability, and low maintenance. There is a growing demand from homeowners for durable outdoor spaces with minimal maintenance. This resulted in a patio reading nook that is intended to provide a place to concentrate rather than to decorate.
Pro Tip: Seal concrete with anti-porous coating to prevent moisture absorption.
12. Double Hanging Egg Chair Bay
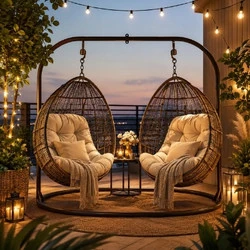
- Best Location: Shared Balconies & Couples’ Spaces
- Setup: Double egg chair, weatherproof cushions, side table, fairy lights
Egg chair designs are frequently cited in Wayfair, IKEA, and Better Homes & Gardens outdoor collections as space-efficient seating for dual occupancy relaxation zones. Examples of how egg chairs can provide a more enjoyable outdoor reading nook experience can be found in Architectural Digest or at many resort-style residential developments where suspended-type furniture is used in association with wellness-based living.
Pro Tip: Install sway dampers to reduce oscillation in windy conditions.
13. Bamboo Screen Privacy Enclosure
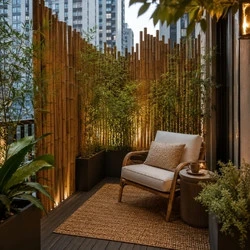
- Best Location: Dense Urban Housing
- Setup: Bamboo panels, outdoor rug, compact lounge chair, planter base
Privacy screening is a core element in urban balcony design guidelines referenced in ASLA residential, where privacy is a critical component of successful residential landscapes because people prefer a sheltered, secure, and cozy outdoor reading space. The concept draws from designers who use screening elements to create outdoor rooms without constructing permanent walls. Bamboo remains especially effective because it combines privacy, texture, and natural character.
Pro Tip: Use staggered bamboo layering to block up to 85% visual exposure.
14. Poolside Cabana with Curtains
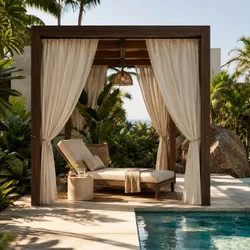
- Best Location: Villas & Resort-Style Homes
- Setup: Cabana frame, lounge chair, weatherproof curtains, side table
Architectural Digest regularly promotes cabanas as an effective way to extend outdoor living because it provides shade, privacy, and shelter without completely enclosing the space. Curtains are raised, or lowered if a person wishes to perch with a book in warm seclusion. In fact, the versatility of the cabana makes it ideal for unwinding and for hosting guests.
Pro Tip: Use UV-rated polyester curtains to reduce heat gain by ~30%. To prevent glare and eye strain when you’re reading, angle your seating slightly away from the swimming pool.
15. The Immersive Plant-Ring Reading Chamber
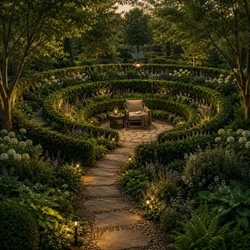
- Best Location: Nature lovers & immersive reading
- Setup: Concentric circular planters, central weatherproof chair, overhead solar lighting.
This area provides one of the most remote outdoor reading nook ideas possible by enveloping the reader in a full circle of layered flora. Contrary to traditional backyard corners that mostly depend on furniture for the focal point, this one actually uses plants to shape the experience. This idea mirrors the biophilic design principles that landscape architects like Thomas Woltz advocate. This is a method of engaging deeply with nature through the design of planting environments.
Pro Tip: Build this ultimate backyard reading corner using evergreen shrubs like boxwoods to maintain year-round visual isolation.
Comparison Table
| Nook Idea | Cost Range | Space | Shade | Privacy | Comfort |
|---|---|---|---|---|---|
| Moon Garden Pergola | $2,800–$4,500 | 120–180 sq ft | 90% | 85% | 88% |
| Greenhouse Nook | $3,500–$6,200 | 80–140 sq ft | 100% | 95% | 98% |
| Fern Grotto | $850–$1,400 | 40–70 sq ft | 75% | 70% | 73% |
| Rattan Cocoon Chair | $550–$950 | 20–40 sq ft | 80% | 80% | 80% |
| Zen Corner | $1,200–$2,100 | 60–100 sq ft | 70% | 65% | 68% |
| Rooftop Hammock Balcony | $550–$800 | 25–50 sq ft | 60% | 75% | 72% |
| Cottagecore Trellis | $400–$750 | 80–120 sq ft | 50% | 60% | 58% |
| Fire Pit Circle | $1,500–$3,200 | 150–250 sq ft | 40% | 50% | 85% |
| Shed Library | $2,200–$4,800 | 100–160 sq ft | 100% | 95% | 96% |
| Vertical Herb Garden | $350–$650 | 30–60 sq ft | 65% | 60% | 63% |
| Concrete Platform | $900–$1,600 | 50–80 sq ft | 70% | 55% | 62% |
| Double Egg Chair | $700–$1,200 | 30–60 sq ft | 80% | 75% | 78% |
| Bamboo Screen | $280–$520 | 20–40 sq ft | 50% | 85% | 72% |
| Poolside Cabana | $1,800–$3,500 | 120–200 sq ft | 85% | 80% | 83% |
| Plant-Ring Chamber | $600–$1,100 | 30–60 sq ft | 85% | 90% | 88% |